Thursday, February 28, 2008
Thursday, February 21, 2008
Create free custom ringtone for iPhone
Steps to create custom ringtones using iTunes for the iPhone.
Requirement, iTunes version 7.5 or above, iPhone Firmware 1.1.2 or above. The screen dumps are in Mac OSX, but can also applies in Windows OS.
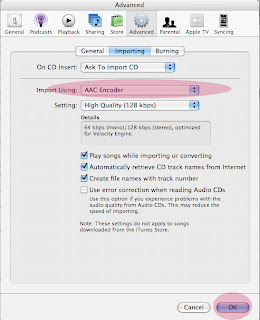
1. Ensure iTunes -> Preferences -> Advanced, Import Using is "AAC Encoder"
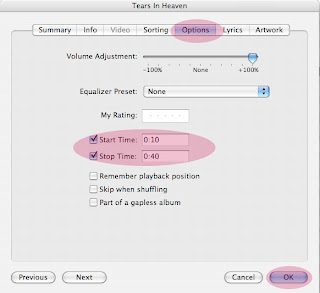
2. Right Click the song in iTunes Library and select "Get Info" and Choose option Tab and edit the Start Time and Stop Time as below
Remember that the selected range should be less than 40 seconds
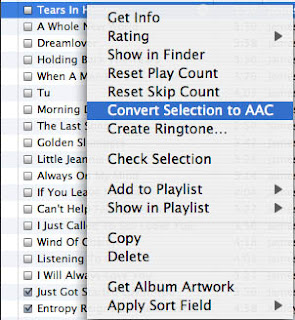
3. Right Click the same song in iTunes Library and select "Convert Selection to AAC"
4. After converion a new song will be created in iTunes Library with the same name but the duration is the selected range in step 2. You can goto the "Recently added" playlist to find it, it will be on the top of Recently added.
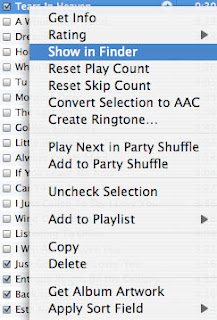
5. Right click the newly created song and select "Show in Finder"
6. Copy the newly created song to desktop and rename it from extension .m4a to .m4r
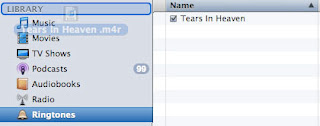
7. Drag the .m4r file back to iTunes Library and the song will be in the Ringtones section of the iTunes Library
Remember the name of the ringtone cannot be too long, less than 15 characters is OK, otherwise the ringtone cannot be synced to iPhone.
8. Goto the song that you have selected in step 2 and reset the Start and Stop Time.
Wednesday, February 20, 2008
Free up iPhone disk space for third party application
Run these in iPhone in order to move the font folder to second disk, you can free about 100M for third party applications
/bin/cp -R -p /System/Library/Fonts /private/var/Fonts
/bin/rm -rf /System/Library/Fonts
/bin/ln -s /private/var/Fonts /System/Library/Fonts
Run these in iPhone in order to move the built-in Ringtones folder to second disk.
/bin/cp -R -p /Library/Ringtones /private/var/Ringtones
/bin/rm -rf /Library/Ringtones
/bin/ln -s /private/var/Ringtones /Library/Ringtones
Run these in iPhone in order to move the built-in Wallpaper folder to second disk.
/bin/cp -R -p /Library/Wallpaper /private/var/Wallpaper
/bin/rm -rf /Library/Wallpaper
/bin/ln -s /private/var/Wallpaper /Library/Wallpaper
Monday, February 18, 2008
Manual backup and restore of data for iPhone upgrade to 1.1.3
You can restore Contact List Calendar Entries, if you sync them in iTunes before upgrade, however, some third-party application data cannot be sync if you use jailbreaked phone.
This will illustrate how to manually backup of iPhone third-partly application data before upgrade and how to restore the data after upgrade.
Assume using Mac and SSH is installed in iPhone
(1) Backup /var/root before upgrade (make sure iPhone Auto_Lock is Never, the backup will take over 45 minutes)
In Mac Terminal
(2) Extract it using command in Mac Terminal
Restore (assume your iPhone has IP address of 192.168.0.11
In Mac Terminal
# restore lighttp Sites
# restore VNotes's recording
# restore camera photos
# restore YouTube bookmarks
# restore Safari Bookmark
Shell script to restore Notes (run in iPhone)
assume you have /var/root/bin/sqlite3 in iPhone
or get it here
This will illustrate how to manually backup of iPhone third-partly application data before upgrade and how to restore the data after upgrade.
Assume using Mac and SSH is installed in iPhone
(1) Backup /var/root before upgrade (make sure iPhone Auto_Lock is Never, the backup will take over 45 minutes)
In Mac Terminal
ssh root@192.168.0.11 "cd /var/; tar -cf - root | gzip -c" > ./iphone_backup_root.tgz
(2) Extract it using command in Mac Terminal
tar -xzvf ./iphone_backup_root.tgz
Restore (assume your iPhone has IP address of 192.168.0.11
In Mac Terminal
# restore lighttp Sites
pushd root
scp -r root/Sites root@192.168.0.11:/var/root/
popd
# restore VNotes's recording
scp root/Library/Recordings/*.amr root@192.168.0.11:/var/mobile/Media/Recordings/
# restore camera photos
scp root/Media/DCIM/100APPLE/IMG*.* root@192.168.0.11:/var/mobile/Media/DCIM/100APPLE/
# restore YouTube bookmarks
scp root/Library/YouTube/Bookmarks.plist root@192.168.0.11:/var/mobile/Library/YouTube/
ssh root@192.168.0.11 "chown mobile:wheel /var/mobile/Library/YouTube/Bookmarks.plist"
# restore Safari Bookmark
scp root/Library/Safari/Bookmarks.plist root@192.168.0.11:/var/mobile/Library/Safari/
ssh root@192.168.0.11 "/usr/bin/chown mobile /var/mobile/Library/Safari/Bookmarks.plist"
Shell script to restore Notes (run in iPhone)
assume you have /var/root/bin/sqlite3 in iPhone
or get it here
#/bin/sh
fw113db="/var/mobile/Library/Notes/notes.db"
fw111db="/var/root/backup/notes.db"
/var/root/bin/sqlite3 -line $fw111db '.dump Note' | grep -v -E "(^CREATE*|^DELETE*|BEGIN$|END;$)" > fw111notes.sql
/var/root/bin/sqlite3 -line $fw111db '.dump note_bodies' | grep -v -E "(^CREATE*|^DELETE*|BEGIN$|END;$)" >> fw111notes.sql
/var/root/bin/sqlite3 -line $fw113db '.dump Note' | grep -v -E "(^CREATE*|^DELETE*|BEGIN$|END;$)" > fw113notes.sql
/var/root/bin/sqlite3 -line $fw113db '.dump note_bodies' | grep -v -E "(^CREATE*|^DELETE*|BEGIN$|END;$)" >> fw113notes.sql
cp $fw113db ./notes_backup.db
/var/root/bin/sqlite3 -line $fw113db '.read fw111notes.sql'
Labels:
iPhone,
iPhone backup,
iPhone restore,
iPhone unlock
iPod Touch Firmware download
iPod Touch 1.1
http://appldnld.apple.com.edgesuite.net/content.info.apple.com/iPod/SBML/osx/bundles/061-3882.20070910.N8uyT/iPod1,1_1.1_3A101a_Restore.ipsw
iPod Touch 1.1.1
http://appldnld.apple.com.edgesuite.net/content.info.apple.com/iPod/SBML/osx/bundles/061-3932.20070927.p23dD/iPod1,1_1.1.1_3A110a_Restore.ipsw
iPod Touch 1.1.2
http://appldnld.apple.com.edgesuite.net/content.info.apple.com/iPod/SBML/osx/bundles/061-4036.20071107.9g3DF/iPod1,1_1.1.2_3B48b_Restore.ipsw
iPod Touch 1.1.3
http://appldnld.apple.com.edgesuite.net/content.info.apple.com/iPod/SBML/osx/bundles/061-3882.20070910.N8uyT/iPod1,1_1.1_3A101a_Restore.ipsw
iPod Touch 1.1.4
http://appldnld.apple.com.edgesuite.net/content.info.apple.com/iPod/SBML/osx/bundles/061-4312.20080226.Btu45/iPod1,1_1.1.4_4A102_Restore.ipsw
http://appldnld.apple.com.edgesuite.net/content.info.apple.com/iPod/SBML/osx/bundles/061-3882.20070910.N8uyT/iPod1,1_1.1_3A101a_Restore.ipsw
iPod Touch 1.1.1
http://appldnld.apple.com.edgesuite.net/content.info.apple.com/iPod/SBML/osx/bundles/061-3932.20070927.p23dD/iPod1,1_1.1.1_3A110a_Restore.ipsw
iPod Touch 1.1.2
http://appldnld.apple.com.edgesuite.net/content.info.apple.com/iPod/SBML/osx/bundles/061-4036.20071107.9g3DF/iPod1,1_1.1.2_3B48b_Restore.ipsw
iPod Touch 1.1.3
http://appldnld.apple.com.edgesuite.net/content.info.apple.com/iPod/SBML/osx/bundles/061-3882.20070910.N8uyT/iPod1,1_1.1_3A101a_Restore.ipsw
iPod Touch 1.1.4
http://appldnld.apple.com.edgesuite.net/content.info.apple.com/iPod/SBML/osx/bundles/061-4312.20080226.Btu45/iPod1,1_1.1.4_4A102_Restore.ipsw
iTunes Old Version download
iTunes for Windows 7.4.3 http://appldnld.apple.com.edgesuite.net/content.info.apple.com/iTunes7/Win/061-3945.20070927.9I8un/iTunes743Setup.exe
iTunes for Windows 7.5 http://appldnld.apple.com.edgesuite.net/content.info.apple.com/iTunes7/Win/061-3902.20071105.G6edS/iTunes75Setup.exe
iTunes for Mac 7.4.2 http://appldnld.apple.com.edgesuite.net/content.info.apple.com/iTunes7/Mac/061-3873.20070917.Rg7Vw/iTunes7.4.2.dmg
iTunes for Mac 7.5 http://appldnld.apple.com.edgesuite.net/content.info.apple.com/iTunes7/Mac/061-3899.20071105.Vg7Tg/iTunes7.5.dmg
Sunday, February 17, 2008
iPhone upgrade to 1.1.3 firmware step by step guide using ziPhone 2.2
see my step by step guide with (Windows XP) diagram posted here
http://www.iphone.org.hk/cgi-bin/ch/topic_show.cgi?id=4920&pg=1&age=0&bpg=1#22257
Mac OS Step by step guide
http://www.iphone.org.hk/cgi-bin/ch/topic_show.cgi?id=5121&h=1&bpg=1&age=0
http://www.iphone.org.hk/cgi-bin/ch/topic_show.cgi?id=4920&pg=1&age=0&bpg=1#22257
Mac OS Step by step guide
http://www.iphone.org.hk/cgi-bin/ch/topic_show.cgi?id=5121&h=1&bpg=1&age=0
P.S.
(1) Install Mobile Terminal version 207 for iPhone 1.1.3
Saturday, February 16, 2008
Operation failed HUAWEI HSUPA/HSDPA/3G E272 modem
Problem : Operation failed when connecting using HSUPA/HSDPA/3G modem
Got this error with my smartone vodafone HUAWEI HSUPA/HSDPA/3G E272 modem in EEE PC Linux
The error log revealed PPP failed and no longer working
Failed to run pon. (pppclientservice.cpp: 1007)
pppd error (pppclientservice.cpp: 1005)
Solution 1:
Re-create a new Network Connection in EEE PC Linux
Solution 2 :
run this in Terminal
sudo rm /var/run/pppd2.tdb
then restart the connection
Thursday, February 14, 2008
Format SD card in eee pc (refomat to other filesystems)
sudo fdisk -l # find your existing devices in Linux
sudo umount /dev/sdb1 # first unmount the device
Assume the partition is already created, you can run the following command to reformat the SDCARD to the supported filesystems in Linux
sudo mkfs.ext2 -L SDCARD /dev/sdb1 # format to ext2
sudo mkfs.ext3 -L SDCARD /dev/sdb1 # format to ext3
sudo mkdosfs -F 32 -n SDCARD /dev/sdb1 # format to FAT32
sudo mkdosfs -F 16 -n SDCARD /dev/sdb1 # format to FAT16
Sunday, February 10, 2008
Install VirtualBox for eee pc linux with 2G ram support
References http://forum.eeeuser.com/viewtopic.php?pid=105740
http://dlsvr01.asus.com/pub/ASUS/EeePC/EeePC4G(701)/VGA_XP_071011.zip
(1) add source in /etc/apt/sources.list
(2) install necessary build-essential
(3) download Linux Kernel from ASUS
http://dlsvr01.asus.com/pub/ASUS/EeePC/701/Linux_Kernel_071127.rar
(4) unrar the Linux Kernel and install the package
dpkg --install linux-source-2.6.21.4-eeepc_5_all.deb
cd /usr/src
tar -xjvf linux-source-2.6.21.4-eeepc.tar.bz2
sudo rm linux-source-2.6.21.4-eeepc.tar.bz2
sudo ln -s /usr/src/linux-source-2.6.21.4-eeepc /usr/src/linux
cd linux-source-2.6.21.4-eeepc
sudo make menuconfig
sudo apt-get install libncurses5-dev
(5) Go to
Processor type and features -> High Memory Support -> Change from "off" to "4gb"
Exit and Save Configuration
(6) cd /usr/src/linux
sudo make oldconfig && sudo make prepare
(7) sudo make all
(8) sudo apt-get install virtualbox
(9) sudo usermod -a -G vboxusers user
(10) create a shell script /home/user/vboxrun.sh
(11) sudo chmod +x /home/user/vboxrun.sh
(12) Edit and Append the text to /opt/xandros/share/AsusLauncher/simpleui.rc
http://dlsvr01.asus.com/pub/ASUS/EeePC/EeePC4G(701)/VGA_XP_071011.zip
(1) add source in /etc/apt/sources.list
deb http://xnv4.xandros.com/xs2.0/upkg-srv2 etch main contrib non-free
deb http://www.VirtualBox.org/debian etch non-free
(2) install necessary build-essential
sudo apt-get install build-essential
(3) download Linux Kernel from ASUS
http://dlsvr01.asus.com/pub/ASUS/EeePC/701/Linux_Kernel_071127.rar
(4) unrar the Linux Kernel and install the package
dpkg --install linux-source-2.6.21.4-eeepc_5_all.deb
cd /usr/src
tar -xjvf linux-source-2.6.21.4-eeepc.tar.bz2
sudo rm linux-source-2.6.21.4-eeepc.tar.bz2
sudo ln -s /usr/src/linux-source-2.6.21.4-eeepc /usr/src/linux
cd linux-source-2.6.21.4-eeepc
sudo make menuconfig
sudo apt-get install libncurses5-dev
(5) Go to
Processor type and features -> High Memory Support -> Change from "off" to "4gb"
Exit and Save Configuration
(6) cd /usr/src/linux
sudo make oldconfig && sudo make prepare
(7) sudo make all
(8) sudo apt-get install virtualbox
(9) sudo usermod -a -G vboxusers user
(10) create a shell script /home/user/vboxrun.sh
sudo /etc/init.d/vboxdrv start
sudo /etc/init.d/vboxnet start
/usr/bin/VirtualBox
sudo /etc/init.d/vboxdrv stop
sudo /etc/init.d/vboxnet stop
(11) sudo chmod +x /home/user/vboxrun.sh
(12) Edit and Append the text to /opt/xandros/share/AsusLauncher/simpleui.rc
Virtual Box
Virtual Box
Virtual Box
Tuesday, February 5, 2008
I'm a new soul I can do this strange world hoping I could learn a bit about how to give and take
I'm a new soul I can do this strange world hoping I could learn a bit about how to give and take.
But since I came here felt the joy and the fear finding myself making every possible mistake
la-la-la-la-la-la-la-la...
I'm a young soul in this very strange world hoping I could learn a bit about what is true and fake.
But why don't please trying to comunnicate finding trust and love is not always easy to make.
la-la-la-la-la-la-la-la...
This is a happy end cause' you don't understand everything you have done wise everything so wrong
this is a happy end come and give me your hand I'll take your far away.
[Refrain]:
I'm a new soul I can do this strange world hoping I could learn a bit about how to give and take but since I came here fellt the joy and the fear finding myself making every possible mistake
la-la-la-la-la-la-la-la...
la-la-la-la-la-la-la-la-la-la....
Friday, February 1, 2008
Change Truetype fonts in EEE PC Linux
Peform these steps if you want to change trutype fonts of eee pc Linux and in firefox
(1) Download Droid Font Family (ZIP of TTF) (1.8 MB)
(2) unzip DroidFamily.zip -d /usr/share/fonts/truetype/
(3) edit these two files
userChrome.css and userContent.css
in /home/user/.mozilla/firefox/9rhzolat.default/chrome/
and add these lines
* {
font-size: 10pt !important;
font-family: Droid Sans Fallback !important;
}
(4) if you don't have userChrome.css and userContent.css
copy them from userChrome-example.css and userContent-example.css
(5) run fc-cache –v –f /usr/share/fonts/
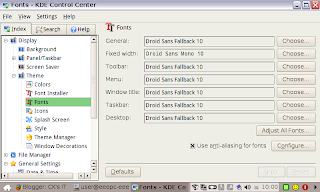
(6) run sudo kcontrol and change the default font for the system as below
Subscribe to:
Posts (Atom)