Monday, November 14, 2022

How to play XBOX games on Mac / PC

(1) Download and install the XEMU Emulator from https://xemu.app/docs/download/

(2) Download the BIOS and everything you need to run XEMU from here

(3) Download the playable xiso for the XEMU emulator from here and here

(4) Set up the controller, BIOS and everything in the app and then load the xiso from step (3) above and then use the app menu to Reset.

Sunday, November 13, 2022

How to patch Redream x86_64 binary

This is how it said here to patch the unzipped executable file in redream.x86_64-windows-v1.5.0-1045-g9f00768.zip
see the patched file below screen dump with the red hex byte, I use linux tool vbindiff in WSL2 to show the difference of the two binary files vbindiff redream.exe redream_patch.exe
Game Rom (GDI format with cheats) can be found here or here

Linux x86_64 patch pattern is here vbindiff redream redream_patched


Sunday, May 8, 2022

How to create React.js app for Google Apps Script WebApp Project in ChromeOS

(1) Goto https://script.google.com/home/usersettings and enable Google Apps Script API

(2) Install nodejs and required packages using Terminal Command
shell script    Select all
sudo apt install nodejs npm mkdir -p ~/webappreact cd ~/webappreact npm init -y #Change the following file in ~/webappreact/package.json as cat > ~/webappreact/package.json <<EOF { "name": "webappreact", "version": "1.0.0", "description": "", "scripts": { "glogin": "clasp login", "glogout": "clasp logout", "gcreate": "clasp create --title 'React Test Project' --rootDir ./apps-script", "gpush": "clasp push", "gpull": "clasp pull", "gstart": "clasp push --watch", "build": "parcel build src/index.html --dist-dir ./apps-script", "start": "parcel src/index.html --dist-dir ./apps-script" }, "keywords": [], "author": "", "license": "ISC" } EOF # install dependencies npm install -D @google/clasp npm install -D @types/google-apps-script # if you use VS Code Editor in ChromeOS npm install -D parcel npm install react react-dom mkdir -p ~/webappreact/apps-script # create ~/webappreact/apps-script/main.js as cat > ~/webappreact/apps-script/main.js <<EOF function doGet() { return HtmlService.createTemplateFromFile("index") .evaluate() .addMetaTag("viewport","width=device-width, initial-scale=1.0") } EOF mkdir -p ~/webappreact/src # create ~/webappreact/src/index.html as cat > ~/webappreact/src/index.html <<EOF <!DOCTYPE html> <html lang="en"> <head> <meta charset="UTF-8"> <title>Document</title> </head> <body> <div id="app"></div> <script type="module"> import "./index.js" </script> </body> </html> EOF # create ~/webappreact/src/index.js as cat > ~/webappreact/src/index.js <<EOF import React from "react" import App from "./App" import { createRoot } from 'react-dom/client'; const container = document.getElementById('app'); const root = createRoot(container); root.render(<App />, app) EOF # create ~/webappreact/src/App.js as cat > ~/webappreact/src/App.js <<EOF function App() { return <div> <h1>First React App</h1> <p>Hello World</p> </div> } export default App EOF


(3) Test building and push to Google Drive using Terminal Command
shell script    Select all
# Testing building cd ~/webappreact npm run build # Testing running in localhost:1234 # For Chrome Browser, please install React Developer Tools in chrome web store for testing at localhost npm run start # Login in to google apps script npm run glogin # Create Project in google apps script and choose spreadsheet npm run gcreate mv ~/webappreact/apps-script/.clasp.json ~/webappreact/ # Push to google apps script npm run gpush


(4) Browser Go to https://script.google.com/home and deploy the React Test Project as webapp and test


(5) Add CSS and react-router
shell script    Select all
mkdir -p ~/webappreact/src/styles/ #Add ~/webappreact/src/styles/main.scss as cat > ~/webappreact/src/styles/main.scss <<EOF h1 { color:green; font-size: 2rem; } p { color:purple; } .css-nav { padding-left: 15px; padding-right: 15px; } EOF # change ~/webappreact/src/index.html as cat > ~/webappreact/src/index.html <<EOF <!DOCTYPE html> <html lang="en"> <head> <meta charset="UTF-8"> <title>Document</title> <style> @import "./styles/main.scss"; </style> </head> <body> <div id="app"></div> <script type="module"> import "./index.js" </script> </body> </html> EOF # install dependencies npm install react-router-dom@6 mkdir -p ~/webappreact/src/components # create ~/webappreact/src/components/Home.js as cat > ~/webappreact/src/components/Home.js <<EOF function Home() { return <> <h1>HomePage</h1> </> } export default Home EOF # create ~/webappreact/src/components/About.js as cat > ~/webappreact/src/components/About.js <<EOF function About() { return <> <h1>About</h1> </> } export default About EOF # create ~/webappreact/src/components/Nav.js as cat > ~/webappreact/src/components/Nav.js <<EOF import { Link } from "react-router-dom" function Nav() { return <> <span className="css-nav"><Link to="/">Home</Link></span> <span className="css-nav"><Link to="/about">About</Link></span> </> } export default Nav EOF # change ~/webappreact/src/index.js as cat > ~/webappreact/src/index.js <<EOF import React from "react" import { BrowserRouter } from "react-router-dom" import App from "./App" import { createRoot } from 'react-dom/client'; const container = document.getElementById('app'); const root = createRoot(container); root.render(<BrowserRouter><App /></BrowserRouter>) EOF # change ~/webappreact/src/App.js as cat > ~/webappreact/src/App.js <<EOF import { Routes, Route } from "react-router-dom" import Home from "./components/Home" import About from "./components/About" import Nav from "./components/Nav" function App() { return <> <Nav /> <Routes> <Route path="/" element={<Home />} /> <Route path="about" element={<About />} /> <Route path="*" element={<Home />} /> </Routes> </> } export default App EOF


(6) Test building and push to Google Drive using Terminal Command
shell script    Select all
# Testing building cd ~/webappreact npm run build # Testing running in localhost:1234 npm run start # Push to google apps script npm run gpush # test again in webapp of Google Apps Script


(7) Add google apps script getData() function as backend
shell script    Select all
# Change ~/webappreact/apps-script/main.js as cat > ~/webappreact/apps-script/main.js <<EOF function doGet() { return HtmlService.createTemplateFromFile("index") .evaluate() .addMetaTag("viewport","width=device-width, initial-scale=1.0") } function getData() { return ( [{ "key": "apple", "value": "green" }, { "key": "banana", "value": "yellow" }] ); } function getSpreadData() { return SpreadsheetApp .getActiveSpreadsheet() .getActiveSheet() .getDataRange() .getValues(); } EOF # Change ~/webappreact/src/components/About.js as cat > ~/webappreact/src/components/About.js <<EOF import React, {useState, useEffect} from "react" function About() { const [data,setData] = useState(null) const [loading, setLoading] = useState(false) if (typeof google === 'object') { useEffect(()=>{ setLoading(true) google.script.run.withSuccessHandler(response => { setData([...response]) setLoading(false) }).withFailureHandler(er => { alert(er) }).getData() },[]) } else { return <> <h1>About</h1> <table> <tbody> <tr> <td><span style={{paddingLeft:'30px',paddingRight:'30px'}}>key: row.key</span></td> <td><span style={{paddingRight:'30px'}}>value: row.value</span></td> </tr> </tbody> </table> </> } if (loading) return <h1>loading...</h1> if (!data) return null; return <> <h1>About Data</h1> <table> <tbody> { data.map((row) => ( <tr> <td><span style={{paddingLeft:'30px',paddingRight:'30px'}}>key: {row.key}</span></td> <td><span style={{paddingRight:'30px'}}>value: {row.value}</span></td> </tr> )) } </tbody> </table> </> } export default About EOF


(8) Push to Google Drive and test in Google Apps Script Web App
shell script    Select all
# Testing building and Push to google apps script cd ~/webappreact npm run build && npm run gpush # test again in webapp of Google Apps Script


Sunday, March 27, 2022

Install Kali Linux on an external drive without modifying Windows EFI partition

Install Kali Linux on an external drive without modifying Windows EFI partition

(1) This method on try and modiying the ESP flag does not work on Kali Linux (everything ISO 10.5 GB), because Kali Linux cannot install when you start with try, you have to use the Installer in the grub menu.
https://www.danbp.org/p/en/node/148

(2) You should unplug the HD or SSD if you try to install to a USB drive for Kali Linux.

(3) That means you should prepare two USB for installing. And when installing the Kali Linux to USB drive, choose force UEFI and let the installer install the grub menu to your new USB stick.

(4) After finishing the installation and let the PC reboot the new USB stick.

(5) After the first boot, remember to turn off the boot and ESP flag in the EFI partition of the new USB stick and reboot to test. This will be a painful experience if not turning it off

(6) To make the USB stick EFI bootable, open root terminal and run
cd /boot/efi/EFI
mkdir -p BOOT
cp /boot/efi/EFI/kali/grubx64.efi /boot/efi/EFI/BOOT/BOOTx64.efi


Wednesday, March 23, 2022

How to compile hashcat v5.1 on M1 Apple Silicon Mac

On Mac M1 machine, compile

# to install hashcat
cd  $HOME/Downloads
git clone https://github.com/hashcat/hashcat.git
cd hashcat
git fetch --all --tags
git checkout tags/v5.1.0 -b v5.1.0-branch
make  # don't make install


# print version
./hashcat --version
# print help
./hashcat --help

# run benchmark
./hashcat -b  -m 2500 -w 3 -d 1

# to install hashcat-utils
cd  $HOME/Downloads
git clone https://github.com/hashcat/hashcat-utils.git
cd hashcat-utils/src
make  # don't make install

# print help
./cap2hccapx.bin --help

# install hcxdumptool & hcxtools

git clone https://github.com/ZerBea/hcxdumptool
cd hcxdumptool/
make # don't make install

git clone https://github.com/ZerBea/hcxtools
cd hcxtools /
make # don't make install

https://gist.github.com/Nav-Appaiya/b8eb3cbf22642aac2ead12884fb6aa80


Linux AMD drivers
https://www.amd.com/en/support/kb/release-notes/rn-amdgpu-unified-linux-20-20
https://www.amd.com/en/support/kb/faq/amdgpu-installation
https://www.incredigeek.com/home/unsupported-deb-based-os-etc-os-release-id-kali/
cd ~/Downloads
tar -Jxvf amdgpu-pro-20.20-1098277-ubuntu-20.04.tar.xz
cd amdgpu-pro-20.20-1098277-ubuntu-20.04
# change line 147based on above
./amdgpu-install -y --uninstall
./amdgpu-install -y --opencl=legacy --headless --no-dkms


Linux Intel drivers
https://www.intel.com/content/www/us/en/developer/tools/opencl-cpu-runtime/overview.html
https://github.com/intel/compute-runtime/releaseshttps://github.com/intel/compute-runtime/releases


On Windows
Download and uncompress from https://hashcat.net/files/hashcat-5.1.0.7z
or see other old versions here https://hashcat.net/hashcat/#download-older

You might need to install drivers for OpenCL
AMD GPUs on Windows require "AMD Radeon Adrenalin 2020 Edition" (20.2.2 or later)
https://www.amd.com/en/support/kb/release-notes/rn-rad-win-20-3-1

Intel CPU only
Intel® CPU Runtime for OpenCL™ Applications 18.1 for Windows* OS (64bit or 32bit)
https://registrationcenter.intel.com/en/forms/?productid=3207


Tuesday, March 22, 2022

How to use Kali Linux for raspberry pi zero W / 2W

This article discribe the the headless installation of Kali Linux on Raspberry Pi Zero W or the new Raspberry Pi Zero2 W. Headless means setup and connect to the Pi Zero without display and keyboard.

(1) Download "Pi-Tail" edition of Kali Linux from https://www.kali.org/get-kali/#kali-arm
pi zero W https://kali.download/arm-images/kali-2022.1/kali-linux-2022.1-raspberry-pi-zero-w-pitail-armel.img.xz
pi zero2 W https://kali.download/arm-images/kali-2022.1/kali-linux-2022.1-raspberry-pi-zero-2-w-pitail-armhf.img.xz

(2) Download balenaEtcher to flash the SD Card, suggest to use 32GB or above.

  If you use the Windows version of balenaEtcher, you don't need to download the image and decompress as it supports get from url, just input the download url and flash the image.

(3.1) After finish flashing, eject the SD card and put it back in order to modify the content for headless setup. Based on this https://github.com/Re4son/RPi-Tweaks/blob/master/pi-tail/Pi-Tail.HOWTO, you have to edit the wpa_supplicant.conf in the first partition of the SD Card.
Existing wpa_supplicant.conf
network={
	ssid="homenet"
	psk=68002fbdacc8812f89c06a2fb6542b2b1126853983a59e0076e5f56df9c5543b
        id_str="home"
        priority=2
}
Get wpa_passphase from linux package wpasupplicant
and the command
wpa_passphrase "MyHomeWifi" "MyPassword" will give you the required psk reuqired
Modify to
network={
	ssid="MyHomeWifi"
	psk=6ac0d834a918dfdb09c7d4581a1665f5f1969ef3967e25cd932eab7c75075d54
        id_str="home"
        priority=2
}

Existing interfaces
iface home inet dhcp
Modify to fixed IP for home
iface home inet static
    address 192.168.1.79
    netmask 255.255.255.0
    gateway 192.168.1.1


(3.2) Modify the mobile set-up
Existing wpa_supplicant.conf
# reading passphrase from stdin
network={
	ssid="mobile-1"
	psk=2b975ade78236c65480641296127688b223b1270e7ce175e7317b5bf6ca4795a
        id_str="mobile-1"
        priority=4
}
Modify to, after running wpa_passphrase "Samsung S22" "mysecretwords"
network={
	ssid="Samsung S22"
	psk=6136bd9f2dced6eced7ec23dc4abed6d8dcff707a148d150ab97905facb6ca33
        id_str="mobile-1"
        priority=4
}

Existing interfaces
iface mobile-1 inet static
    address 192.168.43.254
    netmask 255.255.255.0
    gateway 192.168.43.1
Modify to DHCP IP address for mobile-1
iface mobile-1 inet dhcp


After set-up of SD Card put it back to the Raspberry Pi Zero card slot and then power-up to connect.

(4) Use wifi connect to Raspberry pi using ssh, username is kali and password is kali
e.g. connect via home wifi with fixed IP 192.168.1.79 that was setup in Step 3.1 above
ssh kali@192.168.1.79


e.g. connect via mobile
First get the IP address for hotspot connection client information on your phone. Then use Terminal App such as Termux on your Android phone to start the ssh session with the IP address obtained.
ssh kali@192.168.99.121


(5) Additional configurations after connection
sudo apt update
sudo dpkg-reconfigure tzdata
sudo dpkg-reconfigure locales 


(6) HOWTO put wlan0 into monitor mode:
   wlan0 can be used both, in tethering and monitor mode at the same time.
   Monitor on (mon0):
    mon0up #This will create and start up a monitoring interface "mon0"
   Monitor off:
    mon0down #This will bring down and remove mon0
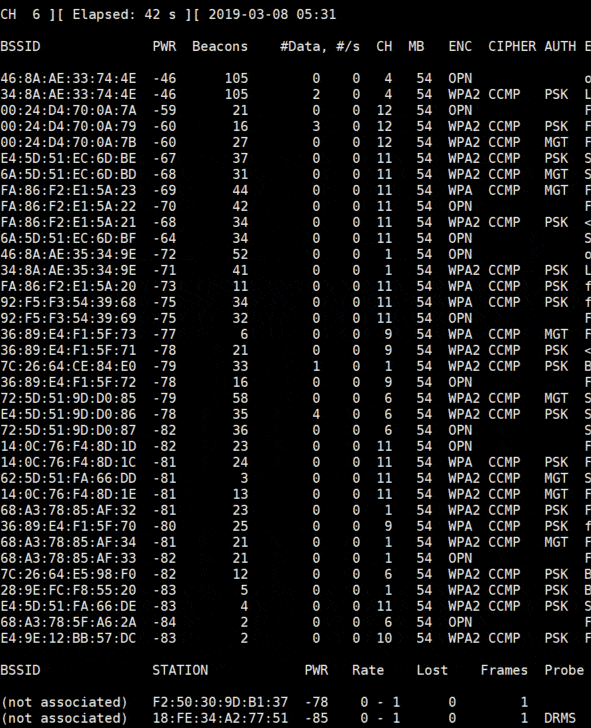
sudo mon0up
sudo airmon-ng
sudo airodump-ng mon0
sudo airodump-ng mon0 --bssid 34:8A:AE:33:74:4E --channel 4 --write mydump


Friday, March 18, 2022

How to create bootable USB for Linux with persistence

(1) Download Ventoy from https://github.com/ventoy/Ventoy/releases e.g. ventoy-1.0.71-windows.zip

(2) Unzip it and in step (3) run Ventoy2Disk.exe to create bootable USB

(3) Download an iso image from say (3.1GB) ubuntu-20.04.4-desktop-amd64.iso from https://ubuntu.com/download/desktop

(4) Open the Ventoy2Disk.exe program (after unzip in step (2) above) and click install to an USB flash drive (say 16GB or above), you can choose Secure boot and/or GPT if you want to. For me, I choose GPT and without Secure Boot. But for older hardware say MBR and without Secure boot, you might want to choose the default.
Attention that the USB drive will be formatted and all the data will be lost after install.

(5) Copy the downloaded ubuntu-20.04.4-desktop-amd64.iso to the USB drive in /iso/ folder of the USB drive. You have to create a new folder /iso in the USB drive first.

(6) Follow the instruction to create /ventoy/ventoy.json (step 9 below) in the USB drive as per format in /ventoy/ventoy.json. You might need to create /ventoy folder first in USB drive.
(7) Download the pre-created persistence image files from https://github.com/ventoy/backend/releases and uncompress it using pkzip for Windows or in wsl use p7zip package. For ubuntu persistence file you have to use the casper-rw file e.g. uncompress the file persistence_ext4_4GB_casper-rw.dat.7z.

(8) put the uncompressed image persistence_ext4_4GB_casper-rw.dat to /persistence/ folder of the USB drive

(9) Copy the iso grub menu to USB disk and save as /ventoy/ubuntu.cfg and edit it so as to skip the file check and skip the try ubuntu
if loadfont /boot/grub/font.pf2 ; then
	set gfxmode=auto
	insmod efi_gop
	insmod efi_uga
	insmod gfxterm
	terminal_output gfxterm
fi

set menu_color_normal=white/black
set menu_color_highlight=black/light-gray

set timeout=5
menuentry "Ubuntu 20.04 persistence" {
	set gfxpayload=keep
	linux	/casper/vmlinuz  file=/cdrom/preseed/ubuntu.seed persistent fsck.mode=skip quiet splash ---
	initrd	/casper/initrd
}
menuentry "Ubuntu (safe graphics)" {
	set gfxpayload=keep
	linux	/casper/vmlinuz  file=/cdrom/preseed/ubuntu.seed maybe-ubiquity quiet splash nomodeset ---
	initrd	/casper/initrd
}
menuentry "OEM install (for manufacturers)" {
	set gfxpayload=keep
	linux	/casper/vmlinuz  file=/cdrom/preseed/ubuntu.seed only-ubiquity quiet splash oem-config/enable=true ---
	initrd	/casper/initrd
}
grub_platform
if [ "$grub_platform" = "efi" ]; then
menuentry 'Boot from next volume' {
	exit 1
}
menuentry 'UEFI Firmware Settings' {
	fwsetup
}
fi


(10) Add the conf_replace to replace the default grub menu the json file in /ventoy/ventoy.json will become
{
    "persistence": [
        {
            "image": "/iso/ubuntu-20.04.4-desktop-amd64.iso",
            "backend": [
                "/persistence/persistence_ext4_4GB_casper-rw.dat"
            ],
            "autosel": 1,
            "timeout": 10
        }     
    ] ,
    
    "conf_replace": [
        {
            "iso": "/iso/ubuntu-20.04.4-desktop-amd64.iso",
            "org": "/boot/grub/grub.cfg",
            "new": "/ventoy/ubuntu.cfg"
        }
    ]
}


(10) Bootup the USB drive and you might need to enter BIOS (e.g. F2 and choose the USB drive as first bootup option and disable Secure boot) in your computer and choose "Try Ubuntu" and don't choose Install.