Monday, September 29, 2008

[How-To] Android emulator

(1) How to install emulator only (that is no JDK, Eclipse IDE or compiler)

(a) Download Android SDK from
http://code.google.com/android/download_list.html

The current version is
android-sdk-windows-1.0_r1.zip (windows)
android-sdk-linux_x86-1.0_r1.zip (linux)

unzip it and put the folder (android-sdk-windows-1.0_r1) to say under

Windows OS

D:\Android\


Linux / Mac OS X

~/Android/


(b) start the emulator in command windows (windows-R -> cmd) / (Linux/Mac OS X -> Terminal) for the first time to setup data directory

Windows OS

D:
cd D:\Android\android-sdk-windows-1.0_r1\tools
emulator -datadir D:\Android


Linux / Mac OS X

cd ~/Android/android-sdk-linux_x86-1.0_r1/tools
./emulator -datadir ~/Android


(2) How to create sdcard for emulator (e.g. 500M)
e.g. To create a sdcard image of 500M with filename sd500m.img

Windows OS

D:
cd D:\Android\android-sdk-windows-1.0_r1\tools
mksdcard -l SD500M 500M D:\Android\sd500m.img


Linux / Mac OS X

cd ~/Android/android-sdk-linux_x86-1.0_r1/tools
./mksdcard -l SD500M 500M ~/Android/sd500m.img


when starting the emulator and adding -sdcard option
Windows OS

D:
cd D:\Android\android-sdk-windows-1.0_r1\tools
emulator -sdcard D:\Android\sd500m.img [.... other options]


Linux / Mac OS X

cd ~/Android/android-sdk-linux_x86-1.0_r1/tools
./emulator -sdcard ~/Android/sd500m.img [.... other options]


(3) How to scale the emulator size when the emulator screen is out of view of your computer

when starting the emulator and adding -scale option (range from 0.1 to 3)

e.g. start the emulator with a scale of 0.5
Windows OS

D:
cd D:\Android\android-sdk-windows-1.0_r1\tools
emulator -scale 0.5 [.... other options]


Linux / Mac OS X

cd ~/Android/android-sdk-linux_x86-1.0_r1/tools
./emulator -scale 0.5 [.... other options]


(4) How to copy Musics and Pictures to the sdcard image for Android emulator

The sdcard image is a FAT32 image. You just double click the file in Mac OSX to mount it.
Inside it, create folders called Musics and Pictures and put your mp3 files and pictures as per screen dump below

(5) How to copy files to sdcard while the emulator is running or when you cannot mount it.

You can mount the sdcard image while the emulator is running, but sometimes you want to copy files to the sdcard in command line mode run this

Make Sure that the emulator is running
Windows OS

D:
cd D:\Android\android-sdk-windows-1.0_r1\tools
adb push mynotebookphoto.png sdcard/Pictures/


Linux / Mac OS X

cd ~/Android/android-sdk-linux_x86-1.0_r1/tools
./adb push mynotebookphoto.png sdcard/Pictures/


However, the emulator will need to restart so that it can acknowledge the new file. This is currently the limitation of the emulator

when copying back from emulator sdcard to local file
Windows OS

D:
cd D:\Android\android-sdk-windows-1.0_r1\tools
adb pull sdcard/Pictures/image01.jpg images01_fromsdcard.jpg


Linux / Mac OS X

cd ~/Android/android-sdk-linux_x86-1.0_r1/tools
./adb pull sdcard/Pictures/image01.jpg images01_fromsdcard.jpg


(6) How to get shell access to emulator
The emulator must be running, and run this
Windows OS

D:
cd D:\Android\android-sdk-windows-1.0_r1\tools
adb shell


Linux / Mac OS X

cd ~/Android/android-sdk-linux_x86-1.0_r1/tools
./adb shell


(7) How to add path of the emulator tools directory to Windows OS, so as no need to change directory to sdk directory
On Windows, right click on My Computer, and select Properties. Under the Advanced tab, hit the Environment Variables button, and in the dialog that comes up, double-click on Path under System Variables and add this to end of the text
Windows OS

D:\Android\android-sdk-windows-1.0_r1\tools;


Please take note that you have to restart the command window for the path to become effective

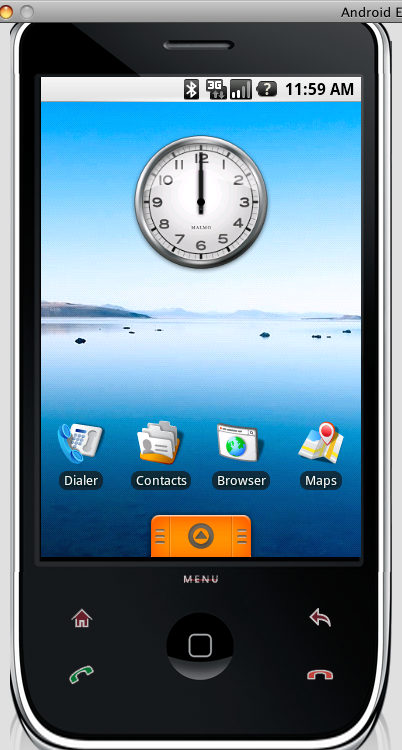
(8) How to change skin for the emulator
You can download some iPhone skins for Android emulator here

http://www.anddev.org/emulator_iphone_skin_-_qvga-hvga_landscape-portrait-t109.html

(9) How to change wallpaper, add new icons to homescreen and move/delete icons.

At Home Screen, press Menu

+ Add -> for adding icons to home screen
Wallpaper -> to change wallpaper

You can flip the homescreen to left and right and add icons there

To delete the icon just click and hold the button and a trash will appear above the menu button then you can drag the icon to the trash and delete it

To move the icon, click and hold the icon and then drag to new position.

Saturday, September 27, 2008

[How-to] Install Android SDK on Asus eeepc Linux

Asus eeepc comes with xandros Debian Linux version but does not have development tools. This guide shows you how to setup the development tools for Android SDK.

Part (A) You need to add the debian package source and install the compiling tools and JDK from Sun in eee pc Linux

(1) Launch Terminal (Ctrl-Alt-T)

(2) edit the file/etc/apt/sources.list
sudo vi /etc/apt/sources.list

and add this line to the end of the file "sources.list"
deb http://http.us.debian.org/debian/ stable main

(3) Run these commands in Terminal to install building tools

sudo apt-get update
sudo apt-get upgrade
sudo apt-get install build-essential ant


(4) Download JDK from Sun
(Latest Release)
http://java.sun.com/javase/downloads/index.jsp

The current version of JDK is
Java SE Development Kit 6u7
Download the Linux version and the file without rpm. That is

jdk-6u7-linux-i586.bin

(5) Run these commands in Terminal to install JDK


chmod +x jdk-6u7-linux-i586.bin
./jdk-6u7-linux-i586.bin

#then follow the install instructions and answer yes and then a directory jdk1.6.0_07 will be created

sudo mv jdk1.6.0_07 /usr/
cd /usr/bin
sudo ln -sf /usr/jdk1.6.0_07/bin/java
sudo ln -sf /usr/jdk1.6.0_07/bin/javac
sudo ln -sf /usr/jdk1.6.0_07/bin/jar


Part (B) Download and Install Android SDK

(1) Download the Android SDK
http://code.google.com/android/download.html

download the Linux version, the current version is
Linux (i386) android-sdk-linux_x86-1.0_r1.zip

(2) unzip and install the android SDK say to /usr/

unzip android-sdk-linux_x86-1.0_r1.zip
sudo mv android-sdk-linux_x86-1.0_r1 /usr/


(3) edit ~/.bash_profile
vi ~/.bash_profile
change
PATH=~/bin:"${PATH}"
to
PATH=~/bin:/usr/android-sdk-linux_x86-1.0_r1/tools:"${PATH}"

(4) Test run Android emulator

starting emulator in portrait mode will be out of view in eeepc, so we need to run it in landscape mode. Moreover the sound does not work.
To start the emuator for the first time, use these commands in Terminal

Assume, Android SDK is installed in /usr and android data will be kept at ~/androiddata


export PATH=${PATH}:/usr/android-sdk-linux_x86-1.0_r1/tools
mkdir -p ~/androiddata
emulator -datadir ~/androiddata -noaudio -skin HVGA-L


or, alternatively, if you have to run the emulator in portrait mode, you need to scale it say by 0.6

emulator -datadir ~/androiddata -noaudio -scale 0.6


Please be patient for the Emulator for the first time as it takes very long to create the data on first installation


Part (C) Test building HelloActivity from the sample code

(1) If you have installed the Andriod SDK and started the emulator for the first time, it is better to reboot the computer first and then start the emulator again.

(2) Create the Projects directory say
mkdir -p ~/Projects

(3) start emulator in Terminal
emulator -noaudio -skin HVGA-L &

(4) copy the HelloActivity from sample of SDK to Projects directory
cp -r /usr/android-sdk-linux_x86-1.0_r1/samples/HelloActivity ~/Projects/

(5) Use activityCreator to create the build file
activitycreator --out ~/Projects/HelloActivity com.example.android.helloactivity

(6) Build the HelloActivity project
cd ~/Projects/
ant


(7) Install the HelloActivity project to emulator
cd ~/Projects/
ant install


Remember, you must start the emulator before installing binary

(8) Then you can test the installed program HelloActivity in the emulator
To uninstall the program do this in Terminal
cd ~/Projects/
ant uninstall


If you need an integrated development environment, use Eclipse and install the plug-ins as described in the Android download site.

If you amend some codes in the Project and want to reinstall use

cd ~/Projects/
ant reinstall


For Mac OS X installation, just skip the Part (A) of this guide and follow similar procedure in other parts, as Mac OS X has these building tools / JDK already installed.

For other sample projects from SDK the activityCreate scripts are
cp -r /usr/android-sdk-linux_x86-1.0_r1/samples/LunarLander ~/Projects/
activitycreator --out ~/Projects/LunarLander com.example.android.lunarlander
cd ~/Projects/LunarLander
ant install

cp -r /usr/android-sdk-linux_x86-1.0_r1/samples/NotePad ~/Projects/
activitycreator --out ~/Projects/NotePad com.example.android.notepad
cd ~/Projects/NotePad
ant install

cp -r /usr/android-sdk-linux_x86-1.0_r1/samples/Snake ~/Projects/
activitycreator --out ~/Projects/Snake com.example.android.snake
cd ~/Projects/Snake
ant install


Enjoy.

Wednesday, September 24, 2008

Android SDK

Really good looking on my Mac


Wednesday, September 17, 2008

Recent apps on your dock for Mac

http://www.tuaw.com/2008/09/16/terminal-tips-add-recent-applications-as-a-stack-on-dock/

Type this in Mac Terminal

defaults write com.apple.dock persistent-others -array-add '{ "tile-data" = { "list-type" = 1; }; "tile-type" = "recents-tile"; }'
killall Dock

Monday, September 8, 2008

How do you create an .ipa file?

This is taken from discussion forum and I found it very useful

What you need:
1: An app
2: A patched MobileInstallation file installed on your iPhone or iPod Touch.
3: Lastly, you need to know that when I say "ProgName", substitute the name of the program you're working with
Getting the iTunesArtwork file
The iTunesArtwork file is simply a jpeg image with the extension taken off, and is included in application's install folder on your device for every app downloaded from the app store. This image is what appears in the Applications section of iTunes as the icon for the app, and is definitely nice to have -- if you don't have it, you get a generic, black icon that no one wants to see. If you have the iTunesArtwork file, skip all this and go down to the next red headline! Otherwise, read on:
1: Open iTunes on your computer and find your application in the iTunes Music Store. On the application's page, find the app icon at the top-left corner of the page and right-click it. Now choose "Copy iTunes Store URL". Your clipboard now contains something like this:
Code:
http://phobos.apple.com/WebObjects/MZStore.woa/wa/viewSoftware?id=284962368&mt=8

2. run this script (which I created) in mac, eg ./getappicon.sh 284962368
Shell script: getappicon.shSelect all

#!/bin/sh
url=`curl -s -L "http://ax.phobos.apple.com.edgesuite.net/WebObjects/MZStore.woa/wa/viewSoftware?id={$1}&mt=8" | gunzip | grep '100x100-75.jpg' | cut -f22 -d"\""`
appname=`curl -s -L "http://ax.phobos.apple.com.edgesuite.net/WebObjects/MZStore.woa/wa/viewSoftware?id={$1}&mt=8" | gunzip | grep '100x100-75.jpg' | cut -f16 -d"\""`
if [ "$appname" = "0" ] ; then
appname=`curl -s -L "http://ax.phobos.apple.com.edgesuite.net/WebObjects/MZStore.woa/wa/viewSoftware?id={$1}&mt=8" | gunzip | grep '100x100-75.jpg' | cut -f18 -d"\""`
fi
echo ${appname}

url100=${url}
curl ${url100} > ${1}.jpg

url512=`echo ${url100} | perl -pe 's/100/512/g'`
curl ${url512} > ${1}_512.jpg


3: Then you will get two jpg files, 284962368_512.jpg & 284962368.jpg Rename the 512 jpeg to iTunesArtwork. You've just gotten your iTunesArtwork file.

Bundling the .IPA
1: Create a folder on your desktop called "working". Open that, and create another folder inside of it called "Payload". Case-sensitive.
2: Move your iTunesArtwork file into the "working" folder, and your .app into the Payload folder.
3: Mac and Linux users only: Open Terminal and run the following command:
Code:
chmod -R 775 ~/Desktop/working/Payload
4: Go into your ProgName.app folder within Payload (Mac users, right-click ProgName.app and choose Show Package Contents).
5 (For Mac users with Dev Tools installed ONLY): Double-click the Info.plist file. The Property List Editor will open and show a simple table. Click the last row of the table, then press the + button that appears to create a new row at the bottom. In the first new cell enter
Code:
SignerIdentity
and in the second new cell, enter
Code:
Apple iPhone OS Application Signing
Save this file.
5 (For Windows, Linux, and other Macs): Visit the following site: https://brokolice.drsny.net/iphone/plutil/ (You may have to Approve the security certificate -- don't worry, it's safe)
Browse for your Info.plist file, and press the "Convert" button. Save the resulting file to your computer. Windows users, open this file in WordPad. Mac and Linux users can use any text editor.
scroll to the bottom of the file and make a new line just before
Code:
</dict>
And paste the following in that spot:
Code:
<key>SignerIdentity</key>
<string>Apple iPhone OS Application Signing</string>
The end of the file should now look like this:
Code:
<key>SignerIdentity</key>
<string>Apple iPhone OS Application Signing</string>
</dict>
</plist>
Save the file (Make sure the name is Info.plist -- case sensitive!) and replace the Info.plist in ProgName.app with it.
6: Time to zip it up. Use your favorite method to zip the iTunesArtwork file and Payload folder together in one .zip file. Mac users can select both, right-click, and choose "Compress 2 Items". Windows users can select both, right-click, and choose "Add to Archive" (remember to select ZIP, not RAR if that option is available).
If you unzip the file, you should see this structure:
Code:

iTunesArtwork
+Payload
AppName.app
7: Rename the zip file to ProgName.ipa
8: All done! Congratulations!