Wednesday, November 25, 2009

Firewall iP v1.1-2 Cracked

Firewall iP v1.1-2 download
http://www.zshare.net/download/68956170edaa0e1f/

Requirement:
mobilesubstrate
firmware 3.0 or above
jailbreak iPhone/iPod Touch

Installation Method
(1) Put it in /var/root/Media/Cydia/AutoInstall/
(2) Restart your device

Description:
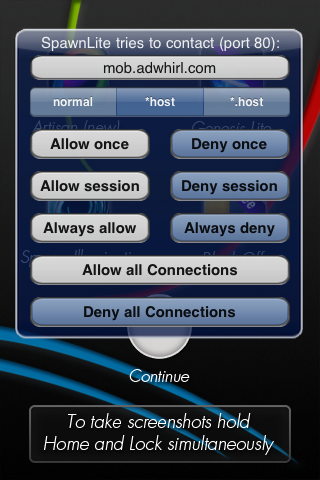
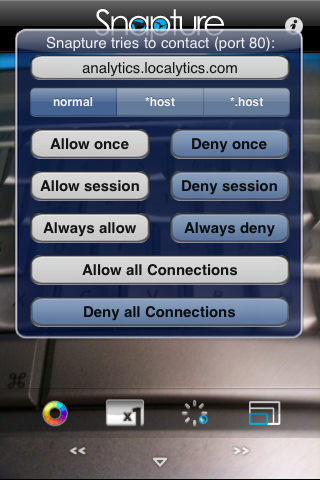
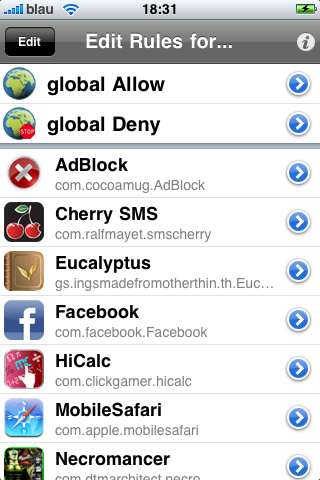
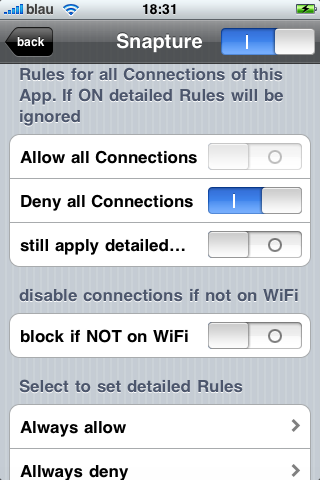
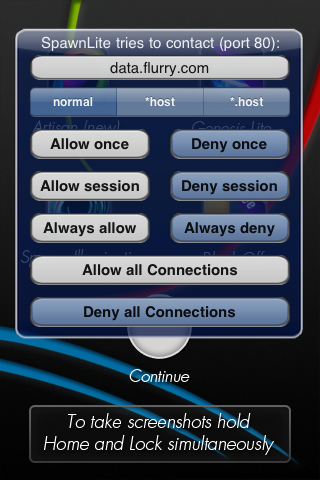
Decide yourself, Securtity for your iPhone and iPod touch Ony for iPhone OS 3.x Firewall iP allows you to block outgoing connections (TCP & UDP). It hooks into applications from AppStore and Cydia. Firewall iP will warn you if the app wants to establish a connection to a host and shows you the hostname. Then you have the options to allow/deny the connection once/always or allow/deny all connections for the application.

Screenshots:


Tuesday, November 24, 2009

How to fake or change iPhone Firmware Version


#backup SystemVersion.plist
cp -p /System/Library/CoreServices/SystemVersion.plist /System/Library/CoreServices/SystemVersion.plist.bak

#change product build version
plutil -key ProductBuildVersion -value 7C144 /System/Library/CoreServices/SystemVersion.plist
#Writing new value for ProductBuildVersion to /System/Library/CoreServices/SystemVersion.plist

#change product version number
plutil -key ProductVersion -value 3.1 /System/Library/CoreServices/SystemVersion.plist
#Writing new value for ProductVersion to /System/Library/CoreServices/SystemVersion.plist

#check firmware version number after change
plutil /System/Library/CoreServices/SystemVersion.plist


Firmware and Build Version
3.0 (7A341)
3.0.1 (7A400)
3.1 (7C144)
3.1.2 (7D11)
3.1.3 (7E18)
plutil -key ProductBuildVersion -value 7E18 /System/Library/CoreServices/SystemVersion.plist
plutil -key ProductVersion -value 3.1.3 /System/Library/CoreServices/SystemVersion.plist
.
.
.

Saturday, November 21, 2009

Google Apps and Google Sync to iPhone

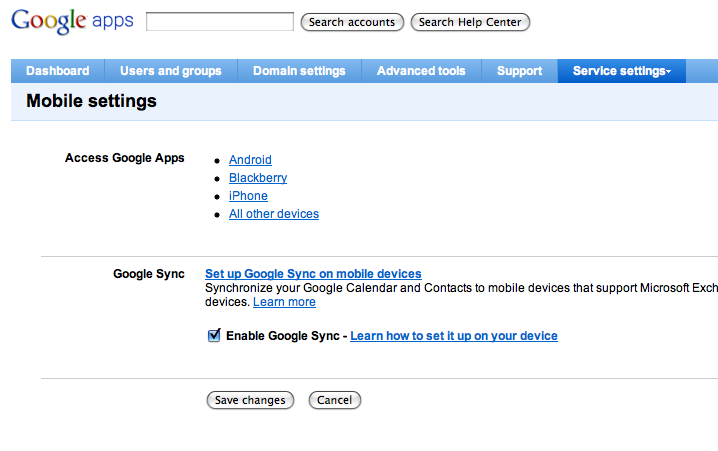
If you have google apps email (that is your own domain, you have to enable mobile sync in your google app dashboard


and follow this guide to enable google sync

http://www.knowliz.com/2009/02/how-to-sync-multiple-calendars-with.html


Thursday, November 19, 2009

Install git for Mac OS X Snow Leopard


mkdir ~/src
cd ~/src/
curl -O http://kernel.org/pub/software/scm/git/git-1.6.5.3.tar.bz2
tar -xjvf git-1.6.5.3.tar.bz2
cd git-1.6.5.3
./configure --prefix=/usr/local
make
sudo make install
git --version


This is how to create git-repo over ssh
suppose you have a project in ~/yourprojectdir
and the remote ssh server login is user@xxx.xxx.xxx.xxx
both client and server have git installed

Method 1

cd ~/yourprojectdir

git init

git add . # include everything below ./ in the first commit;
          # if you want to remove use git rm -r --cache xxx

git commit

cd ..

git clone --bare ~/yourprojectdir yourproject.git

touch yourproject.git/git-daemon-export-ok


then copy the git directory to your ssh sever

scp -r yourproject.git user@xxx.xxx.xxx.xx:/Volumes/HD/git/


setup git repo in ssh server

ssh user@xxx.xxx.xxx.xx "cd /Volumes/HD/git/yourproject.git; git --bare update-server-info; mv hooks/post-update.sample hooks/post-update"


check the location of remote git binary and the remote ssh login shell

ssh user@xxx.xxx.xxx.xxx "which git-upload-pack"
ssh user@xxx.xxx.xxx.xxx "echo \$PATH"

mine is /usr/local/bin/git-upload-pack


if the remote login shell does not include path of git, create ~/.bashrc in your remote ssh login shell

ssh user@xxx.xxx.xxx.xxx "echo 'export PATH=\${PATH}:/usr/local/bin' > ~/.bashrc"


push to remote git repo

cd ~/yourprojectdir

git remote add origin ssh://user@xxx.xxx.xxx.xxx/Volumes/HD/git/yourproject.git

git push origin master


Method 2

Create git repo in remote server

ssh user@xxx.xxx.xxx.xxx "mkdir -p /Volumes/HD/git/yourproject.git; cd /Volumes/HD/git/yourproject.git; git --bare init; touch git-daemon-export-ok"


Check the location of remote git binary and the remote ssh login shell as per Method 1

Commit project in your local and push to git repo

cd ~/yourprojectdir

git init

git add . # include everything below ./ in the first commit;
          # if you want to remove use git rm -r --cache xxx

git commit

git remote add origin ssh://user@xxx.xxx.xxx.xxx/Volumes/HD/git/yourproject.git

git push origin master


Test git clone

cd ~
git clone ssh://user@xxx.xxx.xxx.xxx/Volumes/HD/git/yourproject.git working
cd working
git log
git checkout


How to Branch

git branch -r # show branch in repo
git checkout -b todo origin/to-do-branch # checkout a new branch
git checkout master # checkout the master branch

git branch next # create new branch
git add .
git commit -m 'commit nextbranch'
git push origin next


How to fetch Branch from github repo

git clone git://github.com/username/repo-name.git
cd repo-name
git branch -r # show branch in repo
git checkout origin/to-do-branch # quick peek at an upstream branch
git checkout -b todo origin/to-do-branch # checkout a new tracking branch


To fetch a remote from github pull request # into your local repo

git fetch origin pull/<ID #>/head:NEWBRANCHNAME
git checkout NEWBRANCHNAME


Others
git config user.name "yourname"
git config user.email "your email"
git init .
git rebase -i
git commit --amend --author="Author Name "
git diff --stat
git diff --word-diff
git log --pretty='%h %d %s (%cr) [%an]' --graph --all
git config --global alias.lg "log --pretty='%Cred%h%Creset %C(yellow)%d%Creset %s %Cgreen(%cr)%Creset %C(cyan)[%an]%Creset' --graph --all"


For subversion, it is here
http://subversion.apache.org/download/#recommended-release


Tuesday, November 17, 2009

How to create an iso image with mkisofs in cygwin


 mkisofs -iso-level 2 -J -R -l -D -N -joliet-long \
 -relaxed-filenames -V "yourlabel" \
 -o yourcd.iso yourdirectory

Saturday, November 14, 2009

appulous who am i ?

the answer is
kyek

What was the name of Hackulous' April Fool's Day app?
Winulous

Hackulous started off as ___________.net?
Geniusblog

The very first public forum dedicated specifically to iPhone 2.0 app cracking was hosted at ___________.com?
haklabs

Who is the cracker most credited with discovering the cracking method we use today?
lsemtex

Who was the admin of Hakstore?
labrat

Who wrote the very first autocracking BASH script?
Flox

__________4fun
b00sted

__________aasdf
bugmenot

What is Haklab's favorite food?
P e n i s

I work for Apple's law firm and have been trying to get Appulous shut down since the beginning.
ian ramage

Who did Labrat attempt to con into writing a private Appulous clone for his website? (It wasn't Hoover Dam.)
andydam


http://iphoneaddict.fr/index.php?post/2009/11/14/Le-site-Appulous-est-desormais-protege-par-un-mot-de-passe

There is a trick to use google search engine cache
e.g. enter this into the google search box
sims site:appulo.us

Friday, November 13, 2009

Parallels Desktop 5 Serial

Parallels Desktop 5
GC956T-XQN1ZM-MG0JC0-3B3JRT-XZTW2T

P1RR7C-A90J0A-0H1HPB-7FENCD-S4MBSG

http://download.parallels.com/desktop/v5/en_us/parallels/ga/ParallelsDesktop-parallels-en_US-5.0.9220.531002.dmg

Update 2009/12/26
Parallels Desktop 5.0

GC956T-XQN1ZM-MG0JC0-3B3JRT-XZTW2T
windup key QC986-27D34-6M3TY-JJXP9-TBGMD

Update 2010/3/17
Parallels Tools Iso latedSoul5591 (MAC)
http://hotfile.com/dl/32232886/c6e763a/Parallel_Tools_IsolatedSoul5591.rar.html

Update 2010/4/26
Parallels Desktop 5.0.9344.558741
http://download.parallels.com/desktop/v5/en_us/parallels/update3/ParallelsDesktop-parallels-en_US-5.0.9344.558741.dmg

Serial No
First:
GFB577-DDJJ9A-VGPP47-EAB1YR-EEQDMJ
After:
MJZQ7R-CNDVAJ-605Z8C-2VC1CN-PXQC5T


Parallels Desktop 6
KRHPFX-CPGPAN-CG13A9-W7VW5S-AS1794

NQT0GS-BS73JA-B03MF3-DBR8F6-58ZJWA

Download here http://download.parallels.com/desktop/v6/en_us/parallels/ga/ParallelsDesktop-parallels-en_US-6.0.11820.602974.dmg

http://download.parallels.com/desktop/v6/en_us/parallels/update2/ParallelsDesktop-parallels-en_US-6.0.12090.660720.dmg

Add these in /etc/hosts to block activation
127.0.0.1 registration.parallels.com
127.0.0.1 pd6.blist.parallels.com


Parallels Desktop 7
Parallels Desktop 7 Download (with Lion virtualization and more)
http://download.parallels.com/desktop/v7/ga/ParallelsDesktop-7.0.14920.689535.dmg

Add these in /etc/hosts to block activation before installation (must do this before starting installation)
127.0.0.1 pd6.blist.parallels.com
127.0.0.1 pd7.blist.parallels.com
127.0.0.1 pdfm7.blist.parallels.com
127.0.0.1 registration.parallels.com
127.0.0.1 parallels.com
127.0.0.1 update.parallels.com


Serial No:
KM7SW A-D0V7WH-40CFX7-WS815F-YV0QRR

Don't Register

.
.
Tuesday, November 10, 2009

Windows 7 Product Key

22TKD-F8XX6-YG69F-9M66D-PMJBM

Sunday, November 1, 2009

[How-to] install Debian and openssh server in T-Mobile G1

Assume you have installed CynogenMod and get busybox in it, you can install Debian system in G1 or other Android phone that has been rooted and have busybox in that custom ROM.

The instruction of setting up debian in G1 is in saurik's site here http://www.saurik.com/id/10
But some of the information are outdated, as the rooting is very simple now and the busybox comes with all custom cooked ROMs.

I like this method as the Debian system is installed in a standalone img file which can be copied to other Android phones.

(1) Download the Debain G1 image here
http://modmygphone.com/files/debian-G1.zip

or
http://rapidshare.com/files/161776007/debian-armel-750.img.bz2

unzip bz2 file with
bunzip2 debian-armel-750.img.bz2

(2) unzip it and copy the img file to sdcard. The image is 750M in size, so make sure you have enough space in sdcard.
adb push debian-armel-750.img /sdcard/kit/

(3) su shell access into G1

adb shell
su


(4) setup mount and chroot

export kit=/sdcard/kit
export mnt=/data/local/mnt
export TERM=linux
export HOME=/root
export PATH=$bin:/usr/bin:/usr/sbin:/bin:$PATH

busybox clear

busybox mkdir -p $mnt

busybox mount -o loop,noatime $kit/debian-armel-750.img $mnt

busybox mount -t devpts devpts $mnt/dev/pts
busybox mount -t proc proc $mnt/proc
busybox mount -t sysfs sysfs $mnt/sys

busybox mkdir -p $mnt/mnt
busybox mkdir -p $mnt/mnt/sdcard $mnt/mnt/system
busybox mkdir -p $mnt/mnt/data $mnt/mnt/dev

busybox mount --bind /sdcard $mnt/mnt/sdcard
busybox mount --bind /system $mnt/mnt/system
busybox mount --bind /data $mnt/mnt/data
busybox mount --bind /dev $mnt/mnt/dev
busybox mount -t tmpfs tmpfs $mnt/tmp -o noatime,mode=1777


busybox chroot $mnt /bin/bash
# now G1 should be in Debian System

rm -f /etc/mtab
ln -s /proc/mounts /etc/mtab


(5) change root password and install OpenSSH and start it

passwd root

apt-get install debian-keyring debian-archive-keyring
apt-get update
apt-get upgrade
apt-get install openssh-server openssh-client
/etc/init.d/ssh start


(6) If the default package source does not work, you can change this file /etc/apt/sources.list to

deb http://ftp.us.debian.org/debian lenny main


(7) if you want to install gcc compiler

apt-get install build-essential


(8) exit the debian system
exit

(9) Before you proceed to copy the Debian system to the /system/sd, please consider to check the partition size of /system/sd first. If you want to manually increase the ext2 partition size, please follow this guide below. Please backup before re-partition as the process will wipe your sdcard data.

http://forum.xda-developers.com/showthread.php?t=534714

This how you can backup the /system/sd and sdcard

adb pull /system/sd/app app
adb pull /system/sd/app-private app-private
adb pull /system/sd/dalvik-cache dalvik-cache
adb pull /sdcard sdcard


and this is how you restore data after repartition the sdcard (remember this is when the phone is booted up and not in recovery mode

adb push app /system/sd/app
adb push app-private /system/sd/app-private
adb push dalvik-cache /system/sd/dalvik-cache
adb push sdcard /sdcard


(10) Reboot G1
reboot

(11) Copy the Debian system to /system/sd if you use CynogenMod ROM and have ext2 partition in the sdcard

cd /data/local/mnt
tar cf - . | (cd /system/sd/; tar xvf -)


(12) create the mount script as /system/sd/userinit.sh

export mnt=/system/sd

export TERM=linux
export HOME=/root

busybox mount -t devpts devpts $mnt/dev/pts
busybox mount -t proc proc $mnt/proc
busybox mount -t sysfs sysfs $mnt/sys

busybox mount --bind /sdcard $mnt/mnt/sdcard
busybox mount --bind /system $mnt/mnt/system
busybox mount --bind /data $mnt/mnt/data
busybox mount --bind /dev $mnt/mnt/dev


append this script if you want to start ssh server automatically
busybox chroot /system/sd /etc/init.d/ssh start

(12) Reboot G1
reboot


(13) Then you can ssh to your G1 by using ssh root@xxx.xxx.xxx.xxx after enable wifi in G1, where xxx.xxx.xxx.xxx is the IP address of G1.


This is how you chroot manually when you use adb shell access
chroot /system/sd /bin/bash