Sunday, March 27, 2022

Install Kali Linux on an external drive without modifying Windows EFI partition

Install Kali Linux on an external drive without modifying Windows EFI partition

(1) This method on try and modiying the ESP flag does not work on Kali Linux (everything ISO 10.5 GB), because Kali Linux cannot install when you start with try, you have to use the Installer in the grub menu.
https://www.danbp.org/p/en/node/148

(2) You should unplug the HD or SSD if you try to install to a USB drive for Kali Linux.

(3) That means you should prepare two USB for installing. And when installing the Kali Linux to USB drive, choose force UEFI and let the installer install the grub menu to your new USB stick.

(4) After finishing the installation and let the PC reboot the new USB stick.

(5) After the first boot, remember to turn off the boot and ESP flag in the EFI partition of the new USB stick and reboot to test. This will be a painful experience if not turning it off

(6) To make the USB stick EFI bootable, open root terminal and run
cd /boot/efi/EFI
mkdir -p BOOT
cp /boot/efi/EFI/kali/grubx64.efi /boot/efi/EFI/BOOT/BOOTx64.efi


Wednesday, March 23, 2022

How to compile hashcat v5.1 on M1 Apple Silicon Mac

On Mac M1 machine, compile

# to install hashcat
cd  $HOME/Downloads
git clone https://github.com/hashcat/hashcat.git
cd hashcat
git fetch --all --tags
git checkout tags/v5.1.0 -b v5.1.0-branch
make  # don't make install


# print version
./hashcat --version
# print help
./hashcat --help

# run benchmark
./hashcat -b  -m 2500 -w 3 -d 1

# to install hashcat-utils
cd  $HOME/Downloads
git clone https://github.com/hashcat/hashcat-utils.git
cd hashcat-utils/src
make  # don't make install

# print help
./cap2hccapx.bin --help

# install hcxdumptool & hcxtools

git clone https://github.com/ZerBea/hcxdumptool
cd hcxdumptool/
make # don't make install

git clone https://github.com/ZerBea/hcxtools
cd hcxtools /
make # don't make install

https://gist.github.com/Nav-Appaiya/b8eb3cbf22642aac2ead12884fb6aa80


Linux AMD drivers
https://www.amd.com/en/support/kb/release-notes/rn-amdgpu-unified-linux-20-20
https://www.amd.com/en/support/kb/faq/amdgpu-installation
https://www.incredigeek.com/home/unsupported-deb-based-os-etc-os-release-id-kali/
cd ~/Downloads
tar -Jxvf amdgpu-pro-20.20-1098277-ubuntu-20.04.tar.xz
cd amdgpu-pro-20.20-1098277-ubuntu-20.04
# change line 147based on above
./amdgpu-install -y --uninstall
./amdgpu-install -y --opencl=legacy --headless --no-dkms


Linux Intel drivers
https://www.intel.com/content/www/us/en/developer/tools/opencl-cpu-runtime/overview.html
https://github.com/intel/compute-runtime/releaseshttps://github.com/intel/compute-runtime/releases


On Windows
Download and uncompress from https://hashcat.net/files/hashcat-5.1.0.7z
or see other old versions here https://hashcat.net/hashcat/#download-older

You might need to install drivers for OpenCL
AMD GPUs on Windows require "AMD Radeon Adrenalin 2020 Edition" (20.2.2 or later)
https://www.amd.com/en/support/kb/release-notes/rn-rad-win-20-3-1

Intel CPU only
Intel® CPU Runtime for OpenCL™ Applications 18.1 for Windows* OS (64bit or 32bit)
https://registrationcenter.intel.com/en/forms/?productid=3207


Tuesday, March 22, 2022

How to use Kali Linux for raspberry pi zero W / 2W

This article discribe the the headless installation of Kali Linux on Raspberry Pi Zero W or the new Raspberry Pi Zero2 W. Headless means setup and connect to the Pi Zero without display and keyboard.

(1) Download "Pi-Tail" edition of Kali Linux from https://www.kali.org/get-kali/#kali-arm
pi zero W https://kali.download/arm-images/kali-2022.1/kali-linux-2022.1-raspberry-pi-zero-w-pitail-armel.img.xz
pi zero2 W https://kali.download/arm-images/kali-2022.1/kali-linux-2022.1-raspberry-pi-zero-2-w-pitail-armhf.img.xz

(2) Download balenaEtcher to flash the SD Card, suggest to use 32GB or above.

  If you use the Windows version of balenaEtcher, you don't need to download the image and decompress as it supports get from url, just input the download url and flash the image.

(3.1) After finish flashing, eject the SD card and put it back in order to modify the content for headless setup. Based on this https://github.com/Re4son/RPi-Tweaks/blob/master/pi-tail/Pi-Tail.HOWTO, you have to edit the wpa_supplicant.conf in the first partition of the SD Card.
Existing wpa_supplicant.conf
network={
	ssid="homenet"
	psk=68002fbdacc8812f89c06a2fb6542b2b1126853983a59e0076e5f56df9c5543b
        id_str="home"
        priority=2
}
Get wpa_passphase from linux package wpasupplicant
and the command
wpa_passphrase "MyHomeWifi" "MyPassword" will give you the required psk reuqired
Modify to
network={
	ssid="MyHomeWifi"
	psk=6ac0d834a918dfdb09c7d4581a1665f5f1969ef3967e25cd932eab7c75075d54
        id_str="home"
        priority=2
}

Existing interfaces
iface home inet dhcp
Modify to fixed IP for home
iface home inet static
    address 192.168.1.79
    netmask 255.255.255.0
    gateway 192.168.1.1


(3.2) Modify the mobile set-up
Existing wpa_supplicant.conf
# reading passphrase from stdin
network={
	ssid="mobile-1"
	psk=2b975ade78236c65480641296127688b223b1270e7ce175e7317b5bf6ca4795a
        id_str="mobile-1"
        priority=4
}
Modify to, after running wpa_passphrase "Samsung S22" "mysecretwords"
network={
	ssid="Samsung S22"
	psk=6136bd9f2dced6eced7ec23dc4abed6d8dcff707a148d150ab97905facb6ca33
        id_str="mobile-1"
        priority=4
}

Existing interfaces
iface mobile-1 inet static
    address 192.168.43.254
    netmask 255.255.255.0
    gateway 192.168.43.1
Modify to DHCP IP address for mobile-1
iface mobile-1 inet dhcp


After set-up of SD Card put it back to the Raspberry Pi Zero card slot and then power-up to connect.

(4) Use wifi connect to Raspberry pi using ssh, username is kali and password is kali
e.g. connect via home wifi with fixed IP 192.168.1.79 that was setup in Step 3.1 above
ssh kali@192.168.1.79


e.g. connect via mobile
First get the IP address for hotspot connection client information on your phone. Then use Terminal App such as Termux on your Android phone to start the ssh session with the IP address obtained.
ssh kali@192.168.99.121


(5) Additional configurations after connection
sudo apt update
sudo dpkg-reconfigure tzdata
sudo dpkg-reconfigure locales 


(6) HOWTO put wlan0 into monitor mode:
   wlan0 can be used both, in tethering and monitor mode at the same time.
   Monitor on (mon0):
    mon0up #This will create and start up a monitoring interface "mon0"
   Monitor off:
    mon0down #This will bring down and remove mon0

sudo mon0up
sudo airmon-ng
sudo airodump-ng mon0
sudo airodump-ng mon0 --bssid 34:8A:AE:33:74:4E --channel 4 --write mydump


Friday, March 18, 2022

How to create bootable USB for Linux with persistence

(1) Download Ventoy from https://github.com/ventoy/Ventoy/releases e.g. ventoy-1.0.71-windows.zip

(2) Unzip it and in step (3) run Ventoy2Disk.exe to create bootable USB

(3) Download an iso image from say (3.1GB) ubuntu-20.04.4-desktop-amd64.iso from https://ubuntu.com/download/desktop

(4) Open the Ventoy2Disk.exe program (after unzip in step (2) above) and click install to an USB flash drive (say 16GB or above), you can choose Secure boot and/or GPT if you want to. For me, I choose GPT and without Secure Boot. But for older hardware say MBR and without Secure boot, you might want to choose the default.
Attention that the USB drive will be formatted and all the data will be lost after install.

(5) Copy the downloaded ubuntu-20.04.4-desktop-amd64.iso to the USB drive in /iso/ folder of the USB drive. You have to create a new folder /iso in the USB drive first.

(6) Follow the instruction to create /ventoy/ventoy.json (step 9 below) in the USB drive as per format in /ventoy/ventoy.json. You might need to create /ventoy folder first in USB drive.
(7) Download the pre-created persistence image files from https://github.com/ventoy/backend/releases and uncompress it using pkzip for Windows or in wsl use p7zip package. For ubuntu persistence file you have to use the casper-rw file e.g. uncompress the file persistence_ext4_4GB_casper-rw.dat.7z.

(8) put the uncompressed image persistence_ext4_4GB_casper-rw.dat to /persistence/ folder of the USB drive

(9) Copy the iso grub menu to USB disk and save as /ventoy/ubuntu.cfg and edit it so as to skip the file check and skip the try ubuntu
if loadfont /boot/grub/font.pf2 ; then
	set gfxmode=auto
	insmod efi_gop
	insmod efi_uga
	insmod gfxterm
	terminal_output gfxterm
fi

set menu_color_normal=white/black
set menu_color_highlight=black/light-gray

set timeout=5
menuentry "Ubuntu 20.04 persistence" {
	set gfxpayload=keep
	linux	/casper/vmlinuz  file=/cdrom/preseed/ubuntu.seed persistent fsck.mode=skip quiet splash ---
	initrd	/casper/initrd
}
menuentry "Ubuntu (safe graphics)" {
	set gfxpayload=keep
	linux	/casper/vmlinuz  file=/cdrom/preseed/ubuntu.seed maybe-ubiquity quiet splash nomodeset ---
	initrd	/casper/initrd
}
menuentry "OEM install (for manufacturers)" {
	set gfxpayload=keep
	linux	/casper/vmlinuz  file=/cdrom/preseed/ubuntu.seed only-ubiquity quiet splash oem-config/enable=true ---
	initrd	/casper/initrd
}
grub_platform
if [ "$grub_platform" = "efi" ]; then
menuentry 'Boot from next volume' {
	exit 1
}
menuentry 'UEFI Firmware Settings' {
	fwsetup
}
fi


(10) Add the conf_replace to replace the default grub menu the json file in /ventoy/ventoy.json will become
{
    "persistence": [
        {
            "image": "/iso/ubuntu-20.04.4-desktop-amd64.iso",
            "backend": [
                "/persistence/persistence_ext4_4GB_casper-rw.dat"
            ],
            "autosel": 1,
            "timeout": 10
        }     
    ] ,
    
    "conf_replace": [
        {
            "iso": "/iso/ubuntu-20.04.4-desktop-amd64.iso",
            "org": "/boot/grub/grub.cfg",
            "new": "/ventoy/ubuntu.cfg"
        }
    ]
}


(10) Bootup the USB drive and you might need to enter BIOS (e.g. F2 and choose the USB drive as first bootup option and disable Secure boot) in your computer and choose "Try Ubuntu" and don't choose Install.


Wednesday, March 9, 2022

How to decompile and repack Android App on ChromeOS (Part 3)

(1) This continues to discuss -> How to decompile android app, previous articles are here (part 1) & (part2)


(2) Part 1 is to demo the use of ChromeOS (devloper mode on) plus the decompile tools and the process of decode and edit some resource files then rebuild the apk using apktool. And Part 2 is to use the jadx tool to decode the apk to java source file and compile it again in Android Studio.


(3) There are possibilities that the jadx tool can not decompile the complete java scources or ending with error. Even if it can be decoded, the project is maybe too complex to rebuild it in Android Studio.


(4) If we can decompile using apktool, we can edit the resource file and smali code, then repack it into apk file. However, this method is only for small modifications in code


(5) For example
cd ~/DecompileProjects # decompile the apk using apktool
apktool.bat d yourapp.apk -o yourapp_out
# edit the smali file, how ? see point(6) below
vim yourapp_out\smali_classes2\com\yourapp\MyService.smali
# build the apk using apktool
apktool b sjbot2 -o yourapp2.apk
# use jadx to decode it to gradle java source files so that you can check for any errors.
jadx --export-gradle yourapp2.apk -d yourapp2_gradle
# check the decompile java scource code before deployment
vim yourapp2_gradle\app\src\main\java\yourapp\MyService.java
# code sign and align the apk
jarsigner -verbose -sigalg SHA256withRSA -keystore my-release-key256.keystore -storepass 123456 yourapp2.apk mykey256
jarsigner -verify -verbose -certs -keystore my-release-key256.keystore yourapp2.apk
zipalign -v 4 yourapp2.apk yourapp2-aligned.apk
# install to emulator or device for testing
adb -s emulator-5556 install yourapp2-aligned.apk


(6) The problem here is how to edit the smali code, the syntax is so complex and like bytecode. So there is no easy path, and either you learn the smali language, or you can use java2smali plug-in for Android Studio to convert java code to smali code and try and error to modify it bit by bit. So using git version control and branching to keep track of your modification is very important in this case. The limitation of java2smali is that it can only be done on a complete project not a single java file, so you have to put a function that is compilable and put it in a project to compile and then convert to smali code.

Get this torrent to learn more on Reverse Engineering.

Friday, March 4, 2022

How to create Android app-signing key for Google Play

(1) (1) Signup with Google Play and pay US$25 as a registration fee for non-business users (comparing Apple is charging US$99 for non-business users). The annual fee with Google Play will depend on your income from playstore.

There is no free app sigening authority in this world. The free certificates out there are for SSL web servers and not for app signing. For Android App and Google Play Store signup her https://play.google.com/console/u/0/signup

(2) Create the first app for testing in the console after verification of phone and email and upon successful payment of the first registration fee.

(2.1) There are 4 options for Application Signing Preferences for Play Store for your first app, choose the first option (a) which is the default called Play App Signing if you don't change it.
(a) Let Google manage and protect your app signing keys (recommended)
(b) Use the same key as other apps in this developer account
(c) Export and upload keys from Java KeyStore
(d) Export and upload keys (without using Java KeyStore)

(3) Use Android Studio to create two keystores
see here https://developer.android.com/studio/publish/app-signing

(4) You have to create two keystores upload-keystore.jks (and with alias of uploadkey) and deployment-keystore.jks (and with alias deploymentkey) for easy reference.
upload-keystore.jks is for signing your artifacts (App Bundle or APKs) to be uploaded to Google Play console. After review and approval, Google will then sign your uploaded App Bundle and distribute via the Play Store for testing or publication.
deployment-keystore.jks is the public certificate of the application signing key. Google uses this certificate to sign the release version of the applications. Use this credential to register your key with the API provider. If you are currently using Google APIs, you can upload keys for application registration and application signing key certificates in the Google Cloud Console.

What is App Bundle ? After August 2021, all new apps and games will be required to publish in Google Play Store with the Android App Bundle format and require new apps to target API level 30 (Android 11) or above.

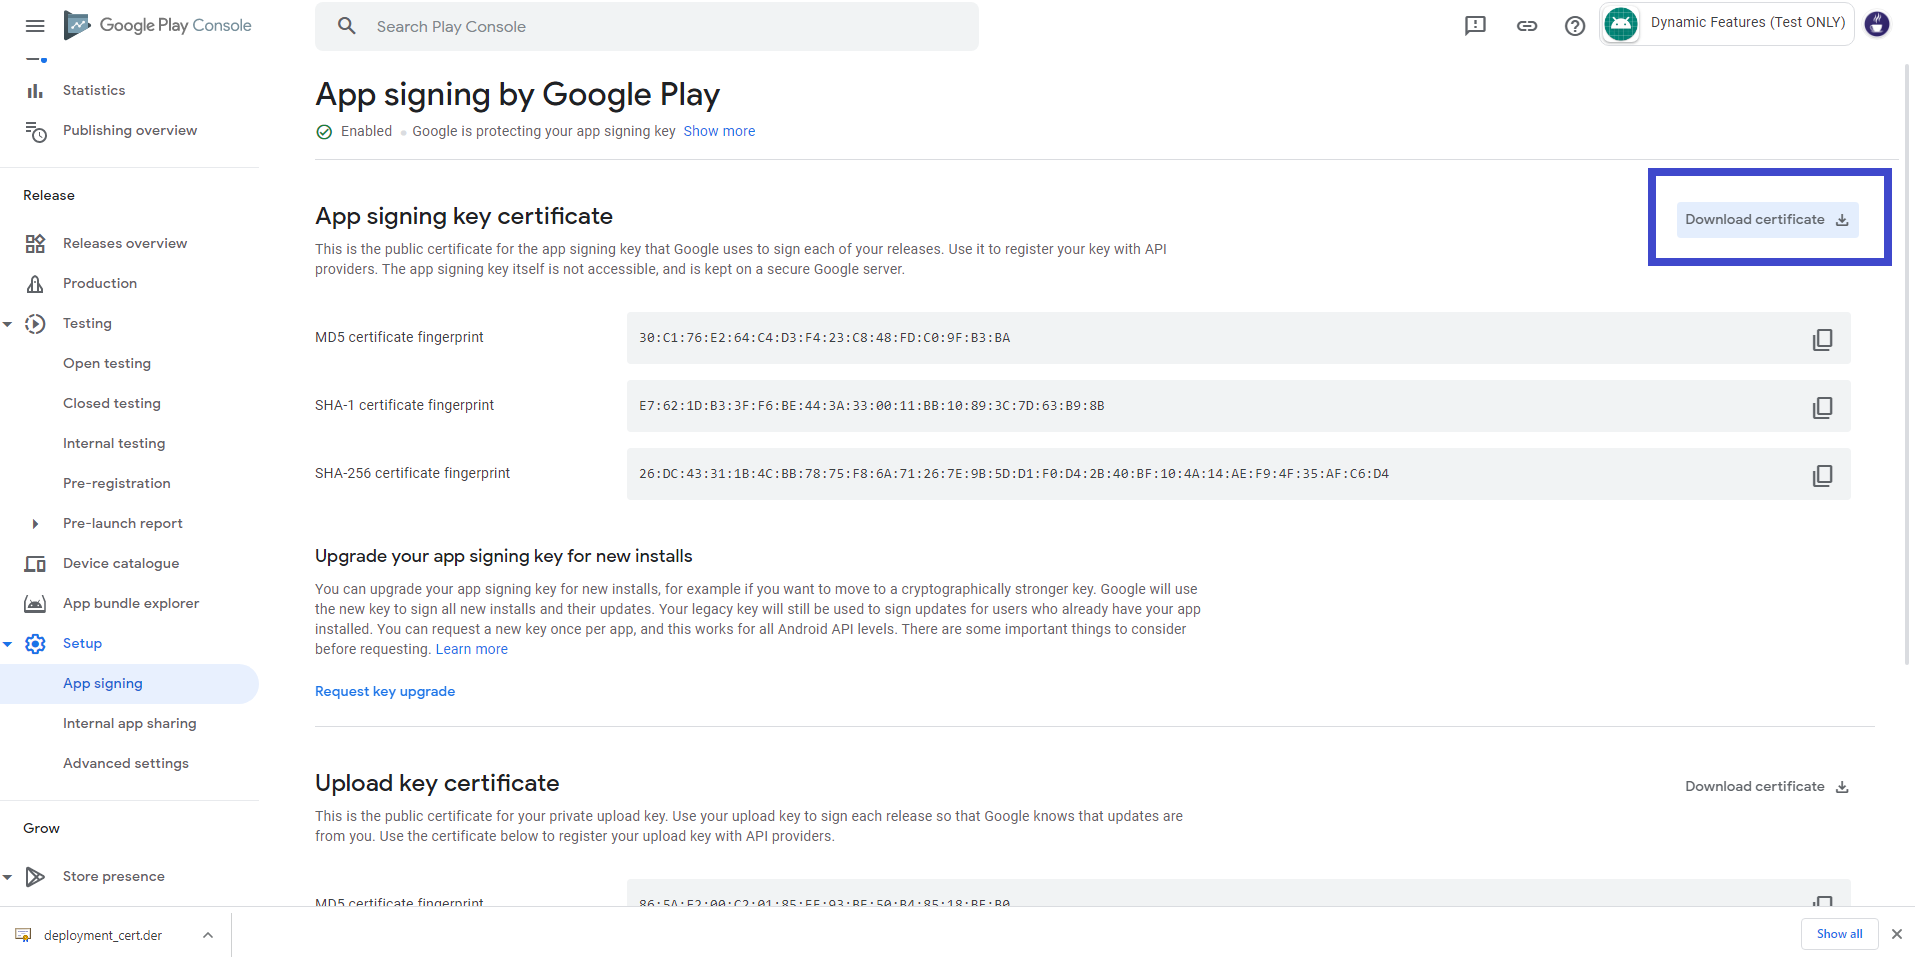
(5) By choosing your first created app, and on the Release > Setup > App Integrity page (after chosing the option of "Let Google manage and protect your app signing key (recommended)"), you can download two certificates as upload_cert.der and deployment_cert.der.

In the Google Play Console App Signing page, you just choose the first option "Let Google manage and protect your app signing key (recommended)", if you are new to Google Play as this method is an upgraded secure key managed by Google. For the recommended option, Google will manage your app signing key, and you don't need to export and upload your private key and instead you need to use the certificate downloaded from Google in the next step(6)and import the certificate to your generated keystore in step (4). Other signing options are for existing developers and has to upload their private key to Google Play console. However, if you lose your keystore (private key in there) or it becomes compromised, you won't be able to update your app without publishing a new app with a new package name.
https://play.google.com/console/u/0/developers/app/keymanagement

(6) Import the two certificates to upload-keystore.jks and deployment-keystore.jks by using the following commands in Terminal.
# keytool can be found in your installed Android Studio folder e.g. /opt/android-studio/jre/bin/keytool or /usr/lib/jvm/java-11-openjdk-amd64/bin/keytool/
or in Windows OS "C:\Program Files\Android\Android Studio\jre\bin\keytool.exe"
# assume the 2 .der certificates are in the same folder as your 2 keystores. keytool -importcert -file upload_cert.der -keystore upload-keystore.jks
keytool -importcert -file deployment_cert.der -keystore deployment-keystore.jks

# You can review your upload_cert SHA1 signature by using this command and it should match with the sha1 signature kept by Google
cat upload_cert.der | openssl sha1 -c

The download certificates contain the public key of Google and combined with the private key in your self created keystore, you will sign the app and Google will then verify your upload_cert SHA1 signature when uploading to Google for review or distribution.
(7) Use Android Studio to sign the App Bundle or apk by choosing the appropriate keystore to sign (upload-keystore.jks for App Bundle signing and uploading to Google and deployment-keystore.jks for application signing key certificate by API provider). For app id, you should use your identifier in order not to conflict with the existing ones in Google Play Store. App ID starting with "com.mycompany" or using an App ID from the public domain or GitHub will likely to cause problems when uploading to Google Play Store

(8) Choose release build type in Android Studio to sign the app bundle. Make sure to change "debuggable to false" in build.gradle file of your gradle.build file, otherwise you will get "Upload Failed. The Android Bundle was not Signed".

So (a) using upload-keystore.jks and (b) Release build type with "debuggable to false" are important for an app bundle to be uploaded successfully and then you can start Roll Out the release for the Internal Test version and "the online link will be in the Testers tab as https://play.google.com/apps/internaltest/XXXXXXXXXXXXXXX" for download. ChromeOS without Developer mode or other Android devices can also download it from Google Play Store and install if they are named internal testers include you.
Moreover, On the Application Dashboard, you can see the Google Play Link for the latest published version.


(9) Google Play requirements
Starting in August 2021, Google Play will require all Android apps to be submitted as Android App Bundles, and to use a target API level of 30 or higher. Verify that the engine you want to use can meet these requirements.


Thursday, March 3, 2022

How to decompile and repack Android App on ChromeOS (Part 2)

(1) This is the sequel to How to decompile android app (part 1)
And the demo apk can be download from here. TouchCalculator_1.0-debug.apk

(2) Part 1 is to demo the use of ChromeOS (devloper mode on) plus the decompile tools and the process of decode and edit some resource files then rebuild the apk using apktool.
If you have Windows machine, you can also download the required decompile tools as demo here.

(3) This part 2 is to continue to modify the logic in the Android App which involved the source code. I will use the JADX tools and Android Studio to edit the code.

cd ~/DecompileProjects
# Use jadx to decode the apk and export gradle project file and java source code
jadx --export-gradle TouchCalculator_1.0-debug.apk -d TouchCalculator2


(4) Then, launch Android Studio and open the project in ~/DecompileProjects/TouchCalculator2 and wait for the gradle to sync. If you try to Build -> Make Project (Ctrl F9), you will notice it has a lot of errors and these errors are mainly partial packages download from repo and many of them are not linkable. So we have to study the code, to see what are the actual code files needed for this project.

(5) Then create a new Android Studio project file with Empty Activity and with the following parameters.


(6) After creation of the new project, copy the decompiled java source code and resource files to the New Project as below:
shell script    Select all
cp ~/DecompileProjects/TouchCalculator2/app/src/main/java/com/pragmatouch/calculator/*.java ~/DecompileProjects/TouchCalculator3/app/src/main/java/com/pragmatouch/calculator/. cp ~/DecompileProjects/TouchCalculator2/app/src/main/res/drawable/k*.xml ~/DecompileProjects/TouchCalculator3/app/src/main/res/drawable/. cp ~/DecompileProjects/TouchCalculator2/app/src/main/res/drawable/stackview1.xml ~/DecompileProjects/TouchCalculator3/app/src/main/res/drawable/. cp ~/DecompileProjects/TouchCalculator2/app/src/main/res/drawable/inputview1.xml ~/DecompileProjects/TouchCalculator3/app/src/main/res/drawable/. cp ~/DecompileProjects/TouchCalculator2/app/src/main/res/drawable/appvertical1.xml ~/DecompileProjects/TouchCalculator3/app/src/main/res/drawable/. cp ~/DecompileProjects/TouchCalculator2/app/src/main/res/values/colors.xml ~/DecompileProjects/TouchCalculator3/app/src/main/res/values/. cp ~/DecompileProjects/TouchCalculator2/app/src/main/res/values/strings.xml ~/DecompileProjects/TouchCalculator3/app/src/main/res/values/. cp ~/DecompileProjects/TouchCalculator2/app/src/main/res/layout/activity_main.xml ~/DecompileProjects/TouchCalculator3/app/src/main/res/layout/ cp ~/DecompileProjects/TouchCalculator2/app/src/main/res/layout/calutor.xml ~/DecompileProjects/TouchCalculator3/app/src/main/res/layout/


(7) Then, there are several changes to the build.gradle settings. Target Sdk should be set to 30 in order to build as App Bundle format.
# Sdk should not use 32 and change to 30
   compileSdk 30
   targetSdk 30

# dependencies package change to lower version as below
   implementation 'androidx.appcompat:appcompat:1.3.0'
   implementation 'com.google.android.material:material:1.3.0'

For Release build type add
   debuggable false


(8) Then, we try to Build -> Make Project (Ctrl F9) again in the New Project and see if there are any errors to solve. For complex project, it is not possible to have a full project file to build after decompile. So there is a part 3 for this topic.

(9) In fact, the project code was from here, so I can find out the required project files easily. However, there are still some features of this app which have not been implemented yet and with the decompiled java source code, you can modify the decompiled code and rebuild it to apk and test again. ALternatively, you can copy the original source code from here and paste them to the relevant java source code files of your new project.

(10) Change the resource files as in Part 1 of this artcile and add the following lines in MainActivity.java to implement the PERCENT, SQRT and RRECIPROC functions. And then Run the app in Android Studio or rebuild the apk to test on real Android device.
diff results    Select all
# diff ./TouchCalculator2/app/src/main/java/com/pragmatouc h/calculator/MainActivity.java ./TouchCalculator3/app/src/main/java/com/pragmatouch/calculator/MainActivity.java 192a193,236 > case 16: // PERCENT > double userInputValue4 = tryParseUserInput(); > if (!Double.isNaN(userInputValue4)) { > if (Double.isNaN(this.memoryValue)) { > this.memoryValue = 0.0d; > } > this.memoryValue = (userInputValue4/100); > this.userInputText.setText(doubleToString(this.memoryValue)); > this.hasFinalResult = true; > return; > } > return; > case 17: // SQRT > // reject negative num > if (currentInputLen > 0 && currentInput.charAt(0) == '-') { > return; > } > double userInputValue5 = tryParseUserInput(); > if (!Double.isNaN(userInputValue5)) { > if (Double.isNaN(this.memoryValue)) { > this.memoryValue = 0.0d; > } > this.memoryValue = Math.sqrt(userInputValue5); > this.userInputText.setText(doubleToString(this.memoryValue)); > this.hasFinalResult = true; > return; > } > return; > case 18: // RECIPROC > // reject zero > if (currentInputLen == 1 && currentInput.charAt(0) == '0') { > return; > } > double userInputValue6 = tryParseUserInput(); > if (!Double.isNaN(userInputValue6)) { > if (Double.isNaN(this.memoryValue)) { > this.memoryValue = 0.0d; > } > this.memoryValue = (1/userInputValue6); > this.userInputText.setText(doubleToString(this.memoryValue)); > this.hasFinalResult = true; > return; > } > return; 276a321,332 > } > try { > $SwitchMap$com$pragmatouch$calculator$KeypadButton[KeypadButton.PERCENT.ordinal()] = 16; > } catch (NoSuchFieldError e16) { > } > try { > $SwitchMap$com$pragmatouch$calculator$KeypadButton[KeypadButton.SQRT.ordinal()] = 17; > } catch (NoSuchFieldError e17) { > } > try { > $SwitchMap$com$pragmatouch$calculator$KeypadButton[KeypadButton.RECIPROC.ordinal()] = 18; > } catch (NoSuchFieldError e18) {


There are still bugs here and please feel free to correct them plus any new enhancements of this calculator and Enjoy Android Studio Programming.


(11) When decompiling some apks that was compiled with old sdk or converting some old android projects to the at least using SDK 30, some conversion of libraries are needed as below:
In build.gradle, you should use androidx instead of old Android Support Libraries
     compileSdkVersion 30
    implementation 'androidx.appcompat:appcompat:1.3.0'
instead of 'com.android.support:appcompat-v7:28.0.0' or something like 'com.android.support:support-v13:26.0.2'
You also should use kotlin library if the decompiled project was converted from kotlin to Java
    implementation "org.jetbrains.kotlin:kotlin-stdlib-jdk7:$kotlin_version"

See here for reference. https://developer.android.com/jetpack/androidx

In gradle.properties, you should setup useAndroidX and enableJetifier
android.useAndroidX=true
android.enableJetifier=true

For converted/decompiled Java classes source, don't use old android support libraries, use androidx instead.
Full class-mapping here https://developer.android.com/jetpack/androidx/migrate/class-mappings
//import android.support.v4.app.NotificationCompat;
//import android.support.v7.app.AppCompatActivity;
//import android.support.v4.app.RemoteInput;
//import android.support.v4.app.Fragment;
import androidx.core.app.NotificationCompat;
import androidx.appcompat.app.AppCompatActivity;
import androidx.core.app.RemoteInput;
import androidx.fragment.app.Fragment;
import androidx.annotation.RequiresApi;
import android.annotation.TargetApi;
import android.annotation.SuppressLint;


(12) If you really want to support old devices and not using androidx, you should use SdkVersion 28 and compatible appcompat version as below:
      compileSdkVersion 28

    implementation 'com.android.support:appcompat-v7:28.0.0'

How to decompile and repack Android App on ChromeOS

(1) You need ChromeOS with developer mode turn on for your machine. Either use a Chromebook (after powerwash) or install a recovery image on your old pc, with developer mode on (see here How to install ChromeOS to your USB stick for your old PC)

(2) You have to install Android Studio and decompile tools on your ChromeOS machine (see here How to run Android Emulator on ChromeOS)

(3) Here is the walkthrough on how to decompile apk and change the resource file and repack and sign the apk file again. Assume you don't have the source code project file. The original demo apk can be download from here. TouchCalculator_1.0-debug.apk

(4) The problem of this TouchCalculator app has two problems on the interface: a) The memory text on the left should be smaller in size b) The key (on the right) with a comma is wrong and it should be a dot for input decimal point. Without the source project file, and in order to modify it, you have to decompile it and study the code and repack it to apk file to run.

(5) Assume, you have the ChromeOS machine and installed software and also setup the decompile tools as in Steps (1) and (2). And In Linux Terminal execute these steps:

mkdir ~/DecompileProjects
cd ~/DecompileProjects
# Then copy the download apk file to this Linux folder DecompileProjects
# Use apktool to decode the apk
apktool decode TouchCalculator_1.0-debug.apk -o TouchCalculator

# After studying the xml files in the res/layout folder
# modify the file: TouchCalculator/res/layout/activity_main.xml
# and change from 25.0sp to a smaller textSize of 12.0sp
   <TextView android:textSize="25.0sp" android:textColor="@color/lightyellow" android:gravity="right" android:id="@id/txtMemory"
#to
   <TextView android:textSize="12.0sp" android:textColor="@color/lightyellow" android:gravity="right" android:id="@id/txtMemory"

# modify the file: TouchCalculator/smali_classes3/com/pragmatouch/calculator/KeypadButton.smali

# line 453 and change the button label from "," to "•"
   const-string v3, ","
# to
   const-string v3, "\u2022"

# Use apktool to build the apk after modification of the resource files
apktool build TouchCalculator -o TouchCalculator_1.01.apk
# generate a keystore with SHA256RSA (if not yet generated) and remember the storepassword
keytool -genkey -v -keystore my-release-key256.keystore -alias mykey256 -sigalg SHA256withRSA -keyalg RSA -keysize 2048 -validity 10000 -deststoretype pkcs12
# sign the apk with self-signed certificate and enter the storepassword
jarsigner -verbose -sigalg SHA256withRSA -keystore my-release-key256.keystore TouchCalculator_1.01.apk mykey256
# verify the signature
jarsigner -verify -verbose -certs -keystore my-release-key256.keystore TouchCalculator_1.01.apk
# zipalign the apk
zipalign -v 4 TouchCalculator_1.01.apk TouchCalculator_1.01-aligned.apk

(6) Install the TouchCalculator_1.01-aligned.apk on your ChromeOS (with developer mode on) machine or your Android device (With Unknown Sources on) for testing. For ChromeOS, please uninstall the previous apk version before installation of the new one.

(7) This is just a proof of concept that using apktool can decompile then modify and repack again to an apk file. To further modify the java / smali code in the decompile source, just stay tune for my next article.


Tuesday, March 1, 2022

How to run Android Emulator on ChromeOS

(1) You need a ChromeOS machine with x86_64 CPU, 8GB RAM or above and for Intel CPU say i5 or above and 128GB storage.

(2) Setup Linux Environment (here) in ChromeOS with at least 20GB linux file size and Download the installation file here and while downloading the file Open the Terminal app then do step 3 below and then follow the Installation Steps of Android Studio in ChromeOS (here).

(3) In Linux Terminal, you have to install libnns3
sudo apt update && sudo apt upgrade
sudo apt install libnss3-dev libgdk-pixbuf2.0-dev libgtk-3-dev libxss-dev


(4) After the acceptance of the license and Finish with the download of SDK platform and tools and this might take some time to download and unzip. Then start Android Studio and with create a new blank project or import a project from github and wait for the update of gradle sync then goto Tools -> SDK Manager to check whether the required SDK are proerly installed and then goto Tools -> Device Manager and click Create device.

(5) Choose a Hardware layout e.g. Phone Pixel 4 XL and then click Next to select a system image e.g. Release Name S, API 31, x86_64 Andoird 12.0 (Google APIs) and then click the Download next to Release Name. This may take a much longer time to download and unzip and would occupy a lot of Linux System storage space if you download more than one image.

(6) After download is done, click Finish and then Next to name the device and fill in Advanced Settings if any and then click Finish to create.

(7) Then start the emulator by Running your project to the emulator and check whether the compileSdkVersion (e.g. 32) in build.gradle for Module match with your download and first click the Build -> Make Project (Ctrl+F9) to see if there is any error. Then, start the project by clicking the Run -> Run App (Shift+F10) or start the Emulator manually in Device Manager. After this step your ChromeOS will experience a significant slow down when the Emulator is running. My testing is that Intel 10th generation i5 CPU with 8GB Ram and 128 GB storage can run reasonably well for the simple project in Android Emulator.

(8) If you want a larger screen or floating window for the Emulator, you can click the Settings button of the elumlator window and set it to View Mode -> Window and then resize the detached window.

(9) You can debug the project source code with the Emulator if you click Run -> Debug App (Shift+F9). If you have enabled Developer Mode in ChromeOS (which is default for Brunch framework). Alternatively, you could build the apk and side load it to the ChromeOS or real device for test run, but debugging on ChromeOS or real device has to first powerwash the ChromeOS machine and then open the ADB port

(10) If you like to have this android studio project (written in Java) for testing, you can download it from here PeamonCalculator.zip

There is another Android Studio Project on Calculator which is written in Kotlin GitHub project source code download here. You might have to change the build SDK version for this project to your Settings in SDK, e.g. compileSdkVersion 32 which is the default SDK version currently for newly installed Android Studio.


(11) If you want to use the JRE from Android Studio in Terminal, add these lines in your ~/.profile
# set JAVA_HOME for Android Studio
export JAVA_HOME=/opt/android-studio/jre
export ANDROID_HOME="$HOME/Android"
export ANDROID_SDK_ROOT="$ANDROID_HOME/Sdk"
PATH="$JAVA_HOME/bin:$ANDROID_SDK_ROOT/build-tools/30.0.3:$PATH"


(12) If you want to install decompile tools on ChromeOS
sudo apt install -y curl unzip
export ANDROID_DECOMPILE_TOOLS=="$ANDROID_HOME/DecompileTools"
# install apktool (d) decompile apk file to smali and resource folders or (b) build them to apk file
mkdir -p $ANDROID_DECOMPILE_TOOLS/apktool && pushd $ANDROID_DECOMPILE_TOOLS/apktool && curl -OL https://bitbucket.org/iBotPeaches/apktool/downloads/apktool_2.6.0.jar && ln -s apktool_2.6.0.jar apktool.jar && curl -OL https://raw.githubusercontent.com/iBotPeaches/Apktool/master/scripts/linux/apktool && chmod +x apktool && popd
# install jadx (to compile smali file to java source code and support whole project or single file conversion)
curl -OL https://github.com/skylot/jadx/releases/download/v1.3.3/jadx-1.3.3.zip && unzip jadx-1.3.3.zip -d $ANDROID_DECOMPILE_TOOLS/jadx && rm -v jadx-1.3.3.zip
PATH="$ANDROID_HOME/DecompileTools/apktool:$ANDROID_HOME/DecompileTools/jadx/bin:$PATH"


# install jadx (to compile java/kotlin project files to smali code, but does not support single file conversion)
For Java2Smali, install the plugin version in Android Studio. File -> Settings (Ctrl-ALt-S ) -> Plugins and search java2smali to install.