Minimum Requirements:
ARM based Android Tablet having more than 7" screen, 1GB RAM and running KitKat (4.4.x).
Please note that Lollipop/Android 5 are not supported in this preview program.
To get started, please follow these steps:
1) If you have not installed, pls follow below instructions to install
a) Become tester by visiting following links –
http://aka.ms/previewword
http://aka.ms/previewexcel
http://aka.ms/previewpowerpoint
b) Wait for 10 minutes to 2 hours as Google play takes time to replicate permissions, then click below mentioned links and follow the download links to install apps using Google play store
Word Preview
https://play.google.com/apps/testing/com.microsoft.office.word
Excel Preview
https://play.google.com/apps/testing/com.microsoft.office.excel
PowerPoint Preview
https://play.google.com/apps/testing/com.microsoft.office.powerpoint
2) If you are getting error in updating the apps, pls uninstall the older version and install.
To install, visit –
http://aka.ms/downloadword
http://aka.ms/downloadexcel
http://aka.ms/downloadpowerpoint
Friday, December 19, 2014
Saturday, November 22, 2014
Android Studio RC1
To install Android Studio manually:
Windows: https://dl.google.com/dl/android/studio/ide-zips/1.0.0-rc1/android-studio-ide-135.1598475-windows.zip (235 MB)
Mac: https://dl.google.com/dl/android/studio/ide-zips/1.0.0-rc1/android-studio-ide-135.1598475-mac.zip (234 MB)
Linux: https://dl.google.com/dl/android/studio/ide-zips/1.0.0-rc1/android-studio-ide-135.1598475-linux.zip (233 MB)

Saturday, November 15, 2014
How to compile C++ Game for Andorid NDK using Mac Terminal and Ant
This is a walkthrough of building C++ application with Android ndk and ant without using Eclipse IDE
1. Download the latest Android SDK from http://dl.google.com/android/android-sdk_r23.0.2-macosx.zip
and install Java SDK SE from Oracle say jdk-7u71-macosx-x64.dmg
2. Download Android NDK from say https://dl.google.com/android/ndk/android-ndk-r9d-darwin-x86_64.tar.bz2
3. Install apache ant
Please take note that for Mac OSX Mavericks, ant is no longer in Mac, just download a binary distribution of Ant from http://ant.apache.org/bindownload.cgi . and unzip/untar it, and add its bin directory to PATH.
4. Use Mac Terminal and add path to the above three installation folders
e.g.
5. Use Terminal command android sdk and android avd to update the sdk (install sdk of minimum of API-15 (Android 4.0.x) and create a new avd)
If you use Intel HAX for fast virt mode in emulator, please set Use Host GPU to on.
6. Download some C++ game source code e.g. here http://www.apress.com/9781430258308 . Just download the Source Code from the book website and extract say chapter2.zip
If you want to support multiple platforms add this APP_ABI in HelloDroid/jni/Application.mk
7. ndk-build
list target (assume sdk installed already in step 5 above)
update project with target 1 (assume target id 1 is already created with API-16 in step 5 above)
list avd (assume "NokiaX" is created in step 5 above)
8. start emulator
debug build
install apk to emulator
Note:
(1) use ant uninstall if need to remove
(2) use Control-fn-F12 to rotate the emulator in Mac
(3) the generated apk file is bin/com.beginndkgamecode.hellodroid-debug.apk
(4) add android:icon to AndroidManifest.xml like this to add a default icon.
<application android:icon="@drawable/ic_launcher" android:label="@string/app_name" ...
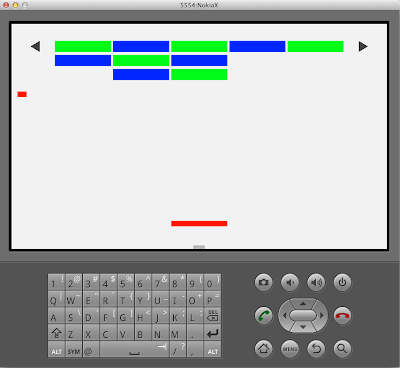
1. Download the latest Android SDK from http://dl.google.com/android/android-sdk_r23.0.2-macosx.zip
and install Java SDK SE from Oracle say jdk-7u71-macosx-x64.dmg
2. Download Android NDK from say https://dl.google.com/android/ndk/android-ndk-r9d-darwin-x86_64.tar.bz2
3. Install apache ant
Please take note that for Mac OSX Mavericks, ant is no longer in Mac, just download a binary distribution of Ant from http://ant.apache.org/bindownload.cgi . and unzip/untar it, and add its bin directory to PATH.
4. Use Mac Terminal and add path to the above three installation folders
e.g.
export PATH=${PATH}:~/android-sdk-macosx/tools:~/android-sdk-macosx/platform-tools:~/android-ndk-r9d:~/apache-ant-1.9.4/bin5. Use Terminal command android sdk and android avd to update the sdk (install sdk of minimum of API-15 (Android 4.0.x) and create a new avd)
If you use Intel HAX for fast virt mode in emulator, please set Use Host GPU to on.
6. Download some C++ game source code e.g. here http://www.apress.com/9781430258308 . Just download the Source Code from the book website and extract say chapter2.zip
If you want to support multiple platforms add this APP_ABI in HelloDroid/jni/Application.mk
APP_PLATFORM := android-16
APP_ABI := armeabi armeabi-v7a x86
7. ndk-build
cd ~/Download/HelloDroid
ndk-build clean && ndk-build
list target (assume sdk installed already in step 5 above)
android list targetupdate project with target 1 (assume target id 1 is already created with API-16 in step 5 above)
android update project -n com.beginndkgamecode.hellodroid -t 1 -p .list avd (assume "NokiaX" is created in step 5 above)
android list avd8. start emulator
emulator -avd NokiaX -scale 0.5 &debug build
ant clean && ant debuginstall apk to emulator
ant debug installNote:
(1) use ant uninstall if need to remove
(2) use Control-fn-F12 to rotate the emulator in Mac
(3) the generated apk file is bin/com.beginndkgamecode.hellodroid-debug.apk
(4) add android:icon to AndroidManifest.xml like this to add a default icon.
<application android:icon="@drawable/ic_launcher" android:label="@string/app_name" ...

Sunday, October 19, 2014
How to run Android 5.0 samples in Android Studio
(1) Install Android 5.0 and Android SDK Build-tools to 21.0.1 using the latest Android Studio

(2) Download the samples from github
say from https://github.com/googlesamples/android-RecyclerView
and use Import Project in Android Studio

(3) Install HAXM if you run emulator in Windows
After you download it make sure you run the setup located in:
{SDK_FOLDER}\extras\intel\Hardware_Accelerated_Execution_Manager\intelhaxm.exe
If you get the error "VT not supported" during the installation disable Hyper-V on windows features. You can execute this command as administrator dism.exe /Online /Disable-Feature:Microsoft-Hyper-V. You will also need "Virtualization Technology" to be enabled on your BIOS.
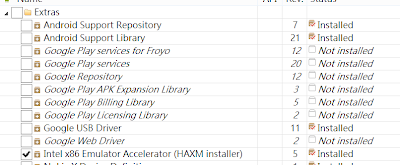
If you are using Mac OSX 10.10 Yosemite, run this (to allow ALL UNSIGNED KEXT to be loaded)
and reboot before installing the package in
{SDK_FOLDER}/extras/intel/Hardware_Accelerated_Execution_Manager/IntelHAXM_1.1.0_for_10.10.dmg
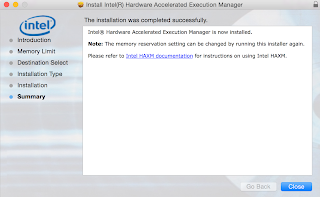
(4) setup AVD like below
Choose Intel Atom X86 and with Ram 768M (for Windows). You can use 2G for Mac

(5)change build.gradle file compileSdkVersion to 21 and buildToolsVersion to "21.0.1"
and also change AndroidManifest.xml file android:minSdkVersion= to "13"


(2) Download the samples from github
say from https://github.com/googlesamples/android-RecyclerView
and use Import Project in Android Studio

(3) Install HAXM if you run emulator in Windows
After you download it make sure you run the setup located in:
{SDK_FOLDER}\extras\intel\Hardware_Accelerated_Execution_Manager\intelhaxm.exe
If you get the error "VT not supported" during the installation disable Hyper-V on windows features. You can execute this command as administrator dism.exe /Online /Disable-Feature:Microsoft-Hyper-V. You will also need "Virtualization Technology" to be enabled on your BIOS.

If you are using Mac OSX 10.10 Yosemite, run this (to allow ALL UNSIGNED KEXT to be loaded)
sudo nvram boot-args="kext-dev-mode=1"and reboot before installing the package in
{SDK_FOLDER}/extras/intel/Hardware_Accelerated_Execution_Manager/IntelHAXM_1.1.0_for_10.10.dmg

(4) setup AVD like below
Choose Intel Atom X86 and with Ram 768M (for Windows). You can use 2G for Mac

(5)change build.gradle file compileSdkVersion to 21 and buildToolsVersion to "21.0.1"
and also change AndroidManifest.xml file android:minSdkVersion= to "13"


Tuesday, October 7, 2014
CSS Selector in Chrome (Part 2) Apple On-line Store for iPhone 6
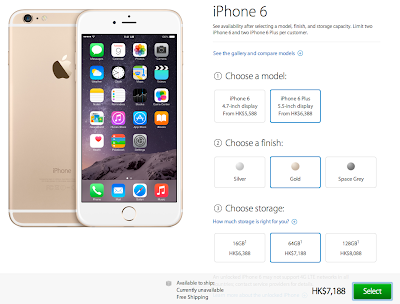
Apple On-line Store for iPhone 6 URL for HK is here
http://store.apple.com/hk/buy-iphone/iphone6
The selection flow and the CSS Selector code are listed as below
(1) Choose a model:
where 0=iPhone 6; 1=iPhone 6 Plus
(2) Choose color:
where 0=Silver; 1=Gold; 2=Space-Grey
(3) Choose storage:
where 0=16GB; 1=64GB; 2=128GB
(4) Product Summary and Availability:
(5) Enable Select button:
note: Chrome supports HTML5 Technique for changing classes
Monitoring program see http://youtu.be/Nj1vcbEyhf4
http://store.apple.com/hk/buy-iphone/iphone6
The selection flow and the CSS Selector code are listed as below
(1) Choose a model:
- AOS/availability Select all
<div id="group-1">
  <div id="Item1" class="step">
    <div class="selection">
      <div class="small-size-buttons enabled">
        <fieldset>
          <legend class="size-selection-header">
            <h2 class="fwl"><span class="section-number step1"><span class="a11y">1</span>>/span>
              <span class="section-heading">Choose a model:</span>
            </h2>
          </legend>
          <div class="selection-buttons">
            <div class="item ">
              <input type="radio" value="4_7inch" id="Item14_7inch" name="dimensionScreensize" class="a11y">
              <label for="Item14_7inch">
                <div class="details">
                  <div class="label">
                    <div class="size-label">iPhone 6
                      <span>4.7-inch display</span>
                    </div>
                    <div class="price">
                        <span itemtype="http://schema.org/Offer" itemprop="offers" itemscope="itemscope">
                          <meta itemprop="priceCurrency" content="HKD">
                          <span itemprop="price">From <span>HK$5,588</span></span>
                        </span>
                    </div>
                  </div>
                </div>
              </label>
            </div>
            <div class="item ">
              <input type="radio" value="5_5inch" id="Item15_5inch" name="dimensionScreensize" class="a11y" checked="">
              <label for="Item15_5inch">
                <div class="details">
                  <div class="label">
                    <div class="size-label">iPhone 6 Plus
                      <span>5.5-inch display</span>
                    </div>
                    <div class="price">
                      <span itemtype="http://schema.org/Offer" itemprop="offers" itemscope="itemscope">
                        <meta itemprop="priceCurrency" content="HKD">
                        <span itemprop="price">From <span>HK$6,388</span></span>
                      </span>
                    </div>
                  </div>
                </div>
              </label>
            </div>
          </div>
        </fieldset>
      </div>
    </div>
  </div>
$("group-1 #Item1 div.selection-buttons div.item").eq(0).find("input").click();where 0=iPhone 6; 1=iPhone 6 Plus
(2) Choose color:
$("group-1 #Item2 div.selection-buttons div.item").eq(0).find("input").click();where 0=Silver; 1=Gold; 2=Space-Grey
(3) Choose storage:
$("group-1 #Item3 div.selection-buttons div.item").eq(0).find("input").click();where 0=16GB; 1=64GB; 2=128GB
(4) Product Summary and Availability:
$("primary .product-title").text() + " " + $("actiontray .customer_commit_display").text();(5) Enable Select button:
- AOS/availability Select all
<div id="actiontray" class="actiontray">
  <ul class="purchase-info">
    <li class="specials"></li>
      <li class="shipping">
        Available to ship<b>:</b><br>
        <span class="customer_commit_display">Currently unavailable</span>
        <span class="freeshipping promo-text">Free Shipping</span>
      </li>
      <li>
      <span class="price">
        <span class="current_price">
          <span itemscope="itemscope" itemprop="offers" itemtype="http://schema.org/Offer">
            <meta itemprop="priceCurrency" content="HKD">
            <span itemprop="price">
              HK$7,188
            </span>
          </span>
        </span>
      </span>
      <span class="financing"></span>
    </li>
    <li class="add-to-cart">
      <button class="button disabled" type="button" disabled="disabled"><span>Select</span></button>
    </li>
    <li class="shipping-lead"></li>
  </ul>
</div>
$("actiontray .add-to-cart .button")[0].classList.remove("disabled");
$("actiontray .add-to-cart .button").removeAttr("disabled");
$("actiontray .add-to-cart .button")[0].classList.add("transactional");
note: Chrome supports HTML5 Technique for changing classes
Monitoring program see http://youtu.be/Nj1vcbEyhf4

Sunday, October 5, 2014
CSS selector in Chrome using the example of Apple iPhone 6 Availability Monitoring
The iPhone 6 Reserve Page for HK is a dynamic web content as in
https://reserve.cdn-apple.com/HK/en_HK/reserve/iPhone/availability

An example of the implementation of monitoring program uses javascript and the Chrome browser and further automation to reserve an iPhone can possibly be completed using Webdriver JS from the Selenium + chrome driver (see http://youtu.be/I1-m_qcmQLk).
To start with and illustrate, the steps for the javascript code preparation are as below:
(1) Goto the website and open the javascript console (Control-Shift-J in PC, Cmd-Option-J in Mac) in Chrome browser

(2) Click the element tab, the dynamic webpage code can be revealed.
(3) Use the CSS style locator (to be entered into the javascript console of Chrome Browser) as below to quickly locate the model selection box and make changes to it, eq(1) being iPhone 6 plus and eq(2) is iPhone 6.
div#wrapper means the div id locator for the id wrapper.
div.two-col-container means the div class locator for the class two-col-container.
(4) Similarly, the code to select the store is
(5) To retrieve the dynamic content of the store info, use
(6) To retrieve the dynamic content of availability of say 16GB sliver, use
(6.1) Similarly, 16GB gold is
(6.2) For others, just repeat and substitute '16GB' for '64GB' and '128GB' and change the eq(0) to eq(1) and eq(2) for different colors, 0=silver, 1=gold, 2=space-grey.
(7) To click the Get Started button on the right of the webpage, use
To automate the scripts, one possible solution is to use node.js + chromedriver
Download and Put the ChromeDriver (note that it is 32 bit only for Windows/Mac) on your PATH
http://chromedriver.storage.googleapis.com/index.html?path=2.10/
and then install node.js from
http://nodejs.org/download/
and see the WebDriver wiki here https://code.google.com/p/selenium/wiki/WebDriverJs
Note: for windows 8, please create folder in "%HOMEPATH%\AppData\Roaming\npm"
before installing WebDriver using "npm install selenium-webdriver"
https://reserve.cdn-apple.com/HK/en_HK/reserve/iPhone/availability

An example of the implementation of monitoring program uses javascript and the Chrome browser and further automation to reserve an iPhone can possibly be completed using Webdriver JS from the Selenium + chrome driver (see http://youtu.be/I1-m_qcmQLk).
To start with and illustrate, the steps for the javascript code preparation are as below:
(1) Goto the website and open the javascript console (Control-Shift-J in PC, Cmd-Option-J in Mac) in Chrome browser

(2) Click the element tab, the dynamic webpage code can be revealed.
- iPhone/availability Select all
<div id="wrapper" class="check-availability">
  <div class="two-col-container">
    <div class="options-container">
      <div class="availability-title-container"> ... </div>
      <div class="storeselect select-style products" style="...">
        <select name="products">
          <option value="">Select a model</option>
          <option data-index="0">iPhone 6 Plus</option>
          <option data-index="1">iPhone 6</option>
        </select>
      </div>
      <div class="storeselect select-style stores" style="...">
        <select name="stores">
          <option value="">Select a store</option>
          <option value="R409">Causeway Bay</option>
          <option value="R485">Festival Walk</option>
          <option value="R428">ifc mall</option>
        </select>
      </div>
(3) Use the CSS style locator (to be entered into the javascript console of Chrome Browser) as below to quickly locate the model selection box and make changes to it, eq(1) being iPhone 6 plus and eq(2) is iPhone 6.
div#wrapper means the div id locator for the id wrapper.
div.two-col-container means the div class locator for the class two-col-container.
$('div#wrapper div.two-col-container div.options-container select[name="products"] option').eq(1).select().attr("selected","selected").change();

$('div#wrapper div.two-col-container div.options-container select[name="products"] option').eq(2).select().attr("selected","selected").change();
(4) Similarly, the code to select the store is
$('div#wrapper div.two-col-container div.options-container select[name="stores"] option').eq(1).select().attr("selected","selected").change();
(5) To retrieve the dynamic content of the store info, use
$("div#wrapper div.two-col-container div.dropdown-container div.results-container .store").text() + $("div#wrapper div.two-col-container div.dropdown-container div.results-container .date").text();(6) To retrieve the dynamic content of availability of say 16GB sliver, use
" 16GB " +$("div#wrapper div.two-col-container div.dropdown-container div.results-container .device-sizes tbody tr").eq(0).attr("class") + " " + $("div#wrapper div.two-col-container div.dropdown-container div.results-container .device-sizes tbody tr").eq(0).find(".16GB .isAvailableText").text();
(6.1) Similarly, 16GB gold is
" 16GB " +$("div#wrapper div.two-col-container div.dropdown-container div.results-container .device-sizes tbody tr").eq(1).attr("class") + " " + $("div#wrapper div.two-col-container div.dropdown-container div.results-container .device-sizes tbody tr").eq(1).find(".16GB .isAvailableText").text();
(6.2) For others, just repeat and substitute '16GB' for '64GB' and '128GB' and change the eq(0) to eq(1) and eq(2) for different colors, 0=silver, 1=gold, 2=space-grey.
(7) To click the Get Started button on the right of the webpage, use
$('div.skip-wrapper div.button-container .button')[0].click();
To automate the scripts, one possible solution is to use node.js + chromedriver
Download and Put the ChromeDriver (note that it is 32 bit only for Windows/Mac) on your PATH
http://chromedriver.storage.googleapis.com/index.html?path=2.10/
and then install node.js from
http://nodejs.org/download/
and see the WebDriver wiki here https://code.google.com/p/selenium/wiki/WebDriverJs
Note: for windows 8, please create folder in "%HOMEPATH%\AppData\Roaming\npm"
before installing WebDriver using "npm install selenium-webdriver"
- appleiphone6_availability.js Select all
#!/usr/bin/env node
// for bash shell
// for i in {1..300}; do sleep 1s; ./appleiphone6_availability.js $i; sleep 39s ; done;

// for windows command line, Use two %% if it is in a batch file
// FOR /L %I IN (1,1,300) DO ("C:\Program Files\nodejs\node.exe" appleiphone6_availability.js %I; sleep 39s)

var args = process.argv.slice(2);
var webdriver = require('selenium-webdriver');
var driver = new webdriver.Builder().withCapabilities({
  browserName : 'chrome',
  'chromeOptions': {
    args: ['test-type']
         }
  }).build();
var isDEBUG = false;
var isAvailable = [false,false,false];
var isAvailableCount = 0;
var products = ["","iPhone 6 Plus","iPhone 6"];
var stores = ["","Causeway Bay","Festival Walk","IFC Mall"];
var fs = require('fs');

function nextaction(msg, p) {
  if (isAvailable[p]) {
    return
  }
  else {
    isAvailable[p] = true;
    isAvailableCount++;
    var driver2 = new webdriver.Builder().withCapabilities(webdriver.Capabilities.chrome()).build();

    driver2.wait(function() {
      driver2.get('http://admin:password@192.168.0.1/sms/newmessage.asp')
      if (isAvailableCount > 1) {
        driver2.findElement(webdriver.By.id("maincontent")).findElement(webdriver.By.name("phoneNumber")).sendKeys("12345678");
      }
      else {
        driver2.findElement(webdriver.By.id("maincontent")).findElement(webdriver.By.name("phoneNumber")).sendKeys("12345678;87654321");
      }
 driver2.findElement(webdriver.By.id("maincontent")).findElement(webdriver.By.id("draftContent")).sendKeys("IR Monitoring: " + msg + " now available");
 driver2.findElement(webdriver.By.id("maincontent")).findElement(webdriver.By.id("send")).click();
 return msg != null;
      }, 3000)
    .then(function() {
      driver2.quit();
      var stream = fs.createWriteStream('availableLog.txt', {flags: 'a', encoding : 'unicode'});
      stream.once('open', function(fd) {
      stream.write('SMS sent ' + msg + '\r\n');
      stream.end();

    });
    console.log("SMS sent OK")
    });
  }
  return
}

function check_availability(p,s) {
  driver.get('https://reserve.cdn-apple.com/HK/en_HK/reserve/iPhone/availability');
  driver.executeScript('$("#wrapper .two-col-container .options-container .storeselect select[name=\'products\'] option").eq('+p+').select().attr("selected","selected").change()')
        .then(function() {
          if (isDEBUG) console.log("product selected");
        }, function(err) {
          console.log('There was an error for product selection ! ' + err);
        });

  driver.executeScript('$("#wrapper .two-col-container .options-container .storeselect select[name=\'stores\'] option").eq('+s+').select().attr("selected","selected").change()')
        .then(function() {
          if (isDEBUG) console.log("store selected");
        }, function(err) {
          console.log('There was an error for store selection ! ' + err);
        });
  if (isDEBUG) console.log('CHECKING ' + products[p] + ' ' + stores[s]);
  driver.wait(function() {
    return driver.executeScript('return $("#wrapper .two-col-container .dropdown-container .results-container .store").text() + $("#wrapper .two-col-container .dropdown-container .results-container .date").text()')
      .then(function(message) {
        console.log(args +'  '+message);
        if (message.length < 5) {
          console.log('CHECKING ' + products[p] + ' ' + stores[s]);
          return webdriver.promise.rejected('Please come back later');
        }
        return message != null;
      });
  }, 3000)
  .then(function() {
    driver.wait(function() {
      return driver.executeScript('return $("#wrapper .two-col-container .dropdown-container .results-container .store").text() \
        + $("#wrapper .two-col-container .dropdown-container .results-container .date").text()  \
        + " 16GB " + $("#wrapper .two-col-container .dropdown-container .results-container .device-sizes tbody tr").eq(0).attr("class") + " "  \
        + $("#wrapper .two-col-container .dropdown-container .results-container .device-sizes tbody tr").eq(0).find(".16GB .isAvailableText").text()  \
        + " 16GB " + $("#wrapper .two-col-container .dropdown-container .results-container .device-sizes tbody tr").eq(1).attr("class") + " "  \
        + $("#wrapper .two-col-container .dropdown-container .results-container .device-sizes tbody tr").eq(1).find(".16GB .isAvailableText").text() \
        + " 16GB " + $("#wrapper .two-col-container .dropdown-container .results-container .device-sizes tbody tr").eq(2).attr("class") + " "  \
        + $("#wrapper .two-col-container .dropdown-container .results-container .device-sizes tbody tr").eq(2).find(".16GB .isAvailableText").text() \
        +  " 64GB " + $("#wrapper .two-col-container .dropdown-container .results-container .device-sizes tbody tr").eq(0).attr("class") + " "  \
        + $("#wrapper .two-col-container .dropdown-container .results-container .device-sizes tbody tr").eq(0).find(".64GB .isAvailableText").text() \
        + " 64GB " + $("#wrapper .two-col-container .dropdown-container .results-container .device-sizes tbody tr").eq(1).attr("class") + " "  \
        + $("#wrapper .two-col-container .dropdown-container .results-container .device-sizes tbody tr").eq(1).find(".64GB .isAvailableText").text() \
        + " 64GB " + $("#wrapper .two-col-container .dropdown-container .results-container .device-sizes tbody tr").eq(2).attr("class") + " "  \
        + $("#wrapper .two-col-container .dropdown-container .results-container .device-sizes tbody tr").eq(2).find(".64GB .isAvailableText").text() \
        +  " 128GB " + $("#wrapper .two-col-container .dropdown-container .results-container .device-sizes tbody tr").eq(0).attr("class") + " "  \
        + $("#wrapper .two-col-container .dropdown-container .results-container .device-sizes tbody tr").eq(0).find(".128GB .isAvailableText").text() \
        + " 128GB " + $("#wrapper .two-col-container .dropdown-container .results-container .device-sizes tbody tr").eq(1).attr("class") + " "  \
        + $("#wrapper .two-col-container .dropdown-container .results-container .device-sizes tbody tr").eq(1).find(".128GB .isAvailableText").text() \
        + " 128GB " + $("#wrapper .two-col-container .dropdown-container .results-container .device-sizes tbody tr").eq(2).attr("class") + " "  \
        + $("#wrapper .two-col-container .dropdown-container .results-container .device-sizes tbody tr").eq(2).find(".128GB .isAvailableText").text()'
      ).then(function(message) {
        if (isDEBUG) console.log(message);
        if(message.indexOf(" Available") > -1) {
          console.log(products[p] + ' ' + stores[s] + "Available "+ message);
          var stream = fs.createWriteStream('availableLog.txt', {flags: 'a', encoding : 'unicode'});
          stream.once('open', function(fd) {
            stream.write(args +'  ' + products[p] + ' ' + stores[s] +' Acailable'+ '\r\n' + message + '\r\n');
            stream.end();
          });
          vailableText = products[p] + ' ' + stores[s]+ ' (' ;
          var is16GBAvailable = false;
          var is64GBAvailable = false;
          var is128GBAvailable = false;
          if(message.indexOf("16GB gold Available") > -1) {
            availableText += "16G金";
            is16GBAvailable = true;
          }
          if(message.indexOf("16GB space-grey Available") > -1) {
            if (is16GBAvailable) { availableText += "灰";}
            else {availableText += "16G灰";}
            is16GBAvailable = true;
          }
          if(message.indexOf("16GB silver Available") > -1) {
            if (is16GBAvailable) { availableText += "銀";}
            else { availableText += "16G銀";}
            is16GBAvailable = true;
          }
          if(message.indexOf("64GB gold Available") > -1) {
            availableText += " 64G金";
            is64GBAvailable = true;
          }
          if(message.indexOf("64GB space-grey Available") > -1) {
            if (is64GBAvailable) { availableText += "灰";}
            else { availableText += " 64G灰";}
            is64GBAvailable = true;
          }
          if(message.indexOf("64GB silver Available") > -1) {
            if (is64GBAvailable) { availableText += "銀";}
            else { availableText += " 64G銀";}
            is64GBAvailable = true;
          }
          if(message.indexOf("128GB gold Available") > -1) {
            availableText += " 128G金";
            is128GBAvailable = true;
          }
          if(message.indexOf("128GB space-grey Available") > -1) {
            if (is128GBAvailable) { availableText += "灰";}
            else { availableText += " 128G灰";}
            is128GBAvailable = true;
          }
          if(message.indexOf("128GB silver Available") > -1) {
            if (is128GBAvailable) { availableText += "銀";}
            else { availableText += " 128G銀";}
            is128GBAvailable = true;
          }
          nextaction(availableText+ ')',p);
        }
        return message != null;
      });
    }, 3000)
  }, function(err){
    console.log('There was an error checking ' + products[p] + ' ' + stores[s] + ' ' + err);
  });
}

// node.js has non-blocking I/O and recursive, there is no need to have a loop here

var p1 = 1;
var s1 = 0;
driver.get('https://reserve.cdn-apple.com/HK/en_HK/reserve/iPhone/availability');
driver.wait(function() {
  if (++s1 > 3) {
    s1=1;
    if (++p1 > 2){p1=1}}
    return check_availability(p1,s1);
  }, 180*1000)
  .then(function() {}
  ,function(err){
    driver.quit();
    console.log('check_availability ' + err);
  });
Saturday, May 3, 2014
Nokia X emulator skin
Download : http://www.2shared.com/file/XCjdetAW/NOKIAX.html
Supports: Landscape and Portrait, Power and Volume Up/Down and Back buttons
Display width : 480
Display height : 800
Installation Location : <sdk>\add-ons\addon-nokia_x_services_device-nokia-16\skins
Supports: Landscape and Portrait, Power and Volume Up/Down and Back buttons
Display width : 480
Display height : 800
Installation Location : <sdk>\add-ons\addon-nokia_x_services_device-nokia-16\skins
Friday, May 2, 2014
How to install Android Studio in Mac OS X
(3) Install JDK say jdk-7u51-macosx-x64.dmg from http://www.oracle.com/technetwork/java/javase/downloads/jdk7-downloads-1880260.html
(2) Download the latest Android Studio IDE from http://tools.android.com/download/studio/canary/latest and install to /Applications/
(3) Download the Android Studio with SDK from http://dl.google.com/dl/android/studio/ide-zips/0.4.2/android-studio-ide-133.970939-mac.zip and extract the sdk subfolder to /Applications/Andriod Studio.app/sdk
or download the SDK here http://dl.google.com/android/android-sdk_r23.0.2-macosx.zip
(4) Change ownership for /Applications/Android Studio.app/sdk using sudo chown -R <yourid>:staff /Applications/Android Studio.app/sdk
(5) Launch Android Studio and change Project Structure to
SDK Location : /Applications/Android Studio.app/sdk
JDK Location : /Library/Java/JavaVirtualMachines/jdk1.7.0_51.jdk/Contents/Home
(6) Tools -> Android -> SDK Manager to install the latest SDK packages Android 4.4.2 API-19
(7) Tools -> Android -> AVD Manager to add AVD
(8) Import Project to test build TouchCalculator.rar. This project has been modified from here and for test build on Android Studio API-19
Download -> http://www.2shared.com/file/XIswagFF/TouchCalculator.html
Another example on how to use Android Studio to create new app can be reference from the workflow demo in this video http://www.youtube.com/watch?v=K2lF862TjU8 The source file in the video page was dead. New project should be created in Android Studio with App Name as "PeamonCalculator" and packagename as "com.example.peamoncalculator.app" and using the default theme "Holo Light with Dark Action Bar" Download the project source from here and replace the following 2 files in the newly created project and use the Nokia X skin for this project source
PeamonCalculator/app/src/main/java/com/example/peamoncalculator/app/MainActivity.java
PeamonCalculator/app/src/main/res/layout/activity_main.xml
unzip ~/Downloads/PeamonCalculator.zip -d ~/YourAndroidStudioProjectFolder/
Monday, January 6, 2014
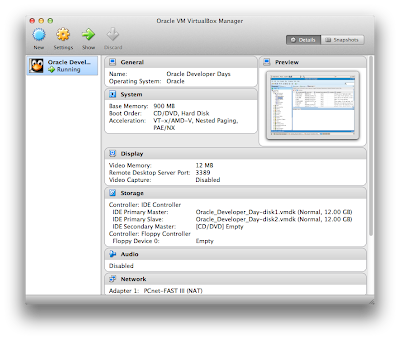
Oracle Developer Days.ova
Virtual Box Download -> https://www.virtualbox.org/wiki/Downloads
Oracle_Developer_Day.ova -> here
Linux Server Login
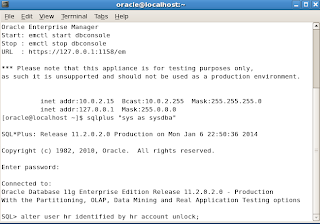
Oracle Developer Days VM root password is also : oracle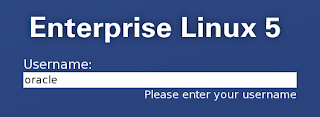
Terminal
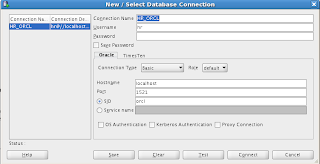
Sql Developer Connection details
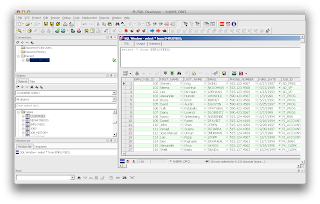
If you need to connect from outside VM, please refer to this article http://barrymcgillin.blogspot.hk/2011/12/using-oracle-developer-days-virtualbox.html on how to add Ethernet or Wifi Adapter. Then you can connect via other clients such as ssh or PLSQL to the new adapter from outside VM. If you use the NAT adapter, you should use the port forwarding setting as in the article.
This is how to show and resize the virtual hard-disk partition if needed
Please refer to this on how to grow the linux partition using GParted http://derekmolloy.ie/resize-a-virtualbox-disk/

To create DBLINK to remote server using Easy Connect Naming (see here http://docs.oracle.com/cd/E11882_01/network.112/e10836/naming.htm#NETAG1125) :
Need to create the DBLINK using "sys as sysdba"
Oracle_Developer_Day.ova -> here

Linux Server Login
username : oracle

password : oracle
Oracle Developer Days VM root password is also : oracle

Terminal
sqlplus "sys as sysdba"

password : 123

SQL> alter user hr identified by hr account unlock;

Sql Developer Connection details
Connection Name : HR_ORCL

Username : hr

Password : hr

Hostname : localhost

Port     : 1521

SID      : orcl

If you need to connect from outside VM, please refer to this article http://barrymcgillin.blogspot.hk/2011/12/using-oracle-developer-days-virtualbox.html on how to add Ethernet or Wifi Adapter. Then you can connect via other clients such as ssh or PLSQL to the new adapter from outside VM. If you use the NAT adapter, you should use the port forwarding setting as in the article.

This is how to show and resize the virtual hard-disk partition if needed
VBoxManage showhdinfo ~/VirtualBox\ VMs/Oracle\ Developer\ Days/Oracle_Developer_Day-disk1.vmdk

VBoxManage showhdinfo ~/VirtualBox\ VMs/Oracle\ Developer\ Days/Oracle_Developer_Day-disk2.vmdk


VBoxManage clonehd ~/VirtualBox\ VMs/Oracle\ Developer\ Days/Oracle_Developer_Day-disk2.vmdk ~/VirtualBox\ VMs/Oracle\ Developer\ Days/Oracle_Developer_Day-disk2A.vdi --format vdi


VBoxManage modifyhd ~/VirtualBox\ VMs/Oracle\ Developer\ Days/Oracle_Developer_Day-disk2A.vdi --resize 40960


VBoxManage clonehd ~/VirtualBox\ VMs/Oracle\ Developer\ Days/Oracle_Developer_Day-disk2A.vdi ~/VirtualBox\ VMs/Oracle\ Developer\ Days/Oracle_Developer_Day-disk2A.vmdk --format vmdk
Please refer to this on how to grow the linux partition using GParted http://derekmolloy.ie/resize-a-virtualbox-disk/

To create DBLINK to remote server using Easy Connect Naming (see here http://docs.oracle.com/cd/E11882_01/network.112/e10836/naming.htm#NETAG1125) :
Need to create the DBLINK using "sys as sysdba"
CREATE PUBLIC DATABASE LINK mydblink

CONNECT TO myusername IDENTIFIED BY "mypassword!"

USING '//172.1.2.3:1521/service_name';
GRANT CREATE SYNONYM, CREATE VIEW, CREATE DATABASE LINK, CREATE PUBLIC SYNONYM, DROP PUBLIC SYNONYM TO HR;
Subscribe to:
Comments (Atom)


