Minimum Requirements:
ARM based Android Tablet having more than 7" screen, 1GB RAM and running KitKat (4.4.x).
Please note that Lollipop/Android 5 are not supported in this preview program.
To get started, please follow these steps:
1) If you have not installed, pls follow below instructions to install
a) Become tester by visiting following links –
http://aka.ms/previewword
http://aka.ms/previewexcel
http://aka.ms/previewpowerpoint
b) Wait for 10 minutes to 2 hours as Google play takes time to replicate permissions, then click below mentioned links and follow the download links to install apps using Google play store
Word Preview
https://play.google.com/apps/testing/com.microsoft.office.word
Excel Preview
https://play.google.com/apps/testing/com.microsoft.office.excel
PowerPoint Preview
https://play.google.com/apps/testing/com.microsoft.office.powerpoint
2) If you are getting error in updating the apps, pls uninstall the older version and install.
To install, visit –
http://aka.ms/downloadword
http://aka.ms/downloadexcel
http://aka.ms/downloadpowerpoint
Showing posts with label Android. Show all posts
Showing posts with label Android. Show all posts
Friday, December 19, 2014

Saturday, November 15, 2014
How to compile C++ Game for Andorid NDK using Mac Terminal and Ant
This is a walkthrough of building C++ application with Android ndk and ant without using Eclipse IDE
1. Download the latest Android SDK from http://dl.google.com/android/android-sdk_r23.0.2-macosx.zip
and install Java SDK SE from Oracle say jdk-7u71-macosx-x64.dmg
2. Download Android NDK from say https://dl.google.com/android/ndk/android-ndk-r9d-darwin-x86_64.tar.bz2
3. Install apache ant
Please take note that for Mac OSX Mavericks, ant is no longer in Mac, just download a binary distribution of Ant from http://ant.apache.org/bindownload.cgi . and unzip/untar it, and add its bin directory to PATH.
4. Use Mac Terminal and add path to the above three installation folders
e.g.
5. Use Terminal command android sdk and android avd to update the sdk (install sdk of minimum of API-15 (Android 4.0.x) and create a new avd)
If you use Intel HAX for fast virt mode in emulator, please set Use Host GPU to on.
6. Download some C++ game source code e.g. here http://www.apress.com/9781430258308 . Just download the Source Code from the book website and extract say chapter2.zip
If you want to support multiple platforms add this APP_ABI in HelloDroid/jni/Application.mk
7. ndk-build
list target (assume sdk installed already in step 5 above)
update project with target 1 (assume target id 1 is already created with API-16 in step 5 above)
list avd (assume "NokiaX" is created in step 5 above)
8. start emulator
debug build
install apk to emulator
Note:
(1) use ant uninstall if need to remove
(2) use Control-fn-F12 to rotate the emulator in Mac
(3) the generated apk file is bin/com.beginndkgamecode.hellodroid-debug.apk
(4) add android:icon to AndroidManifest.xml like this to add a default icon.
<application android:icon="@drawable/ic_launcher" android:label="@string/app_name" ...
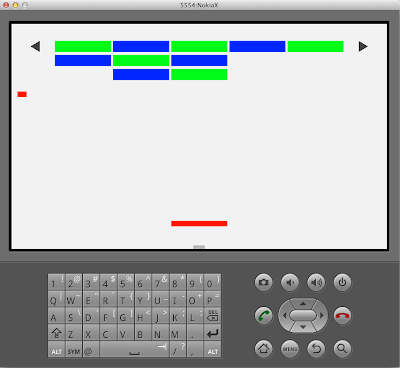
1. Download the latest Android SDK from http://dl.google.com/android/android-sdk_r23.0.2-macosx.zip
and install Java SDK SE from Oracle say jdk-7u71-macosx-x64.dmg
2. Download Android NDK from say https://dl.google.com/android/ndk/android-ndk-r9d-darwin-x86_64.tar.bz2
3. Install apache ant
Please take note that for Mac OSX Mavericks, ant is no longer in Mac, just download a binary distribution of Ant from http://ant.apache.org/bindownload.cgi . and unzip/untar it, and add its bin directory to PATH.
4. Use Mac Terminal and add path to the above three installation folders
e.g.
export PATH=${PATH}:~/android-sdk-macosx/tools:~/android-sdk-macosx/platform-tools:~/android-ndk-r9d:~/apache-ant-1.9.4/bin5. Use Terminal command android sdk and android avd to update the sdk (install sdk of minimum of API-15 (Android 4.0.x) and create a new avd)
If you use Intel HAX for fast virt mode in emulator, please set Use Host GPU to on.
6. Download some C++ game source code e.g. here http://www.apress.com/9781430258308 . Just download the Source Code from the book website and extract say chapter2.zip
If you want to support multiple platforms add this APP_ABI in HelloDroid/jni/Application.mk
APP_PLATFORM := android-16
APP_ABI := armeabi armeabi-v7a x86
7. ndk-build
cd ~/Download/HelloDroid
ndk-build clean && ndk-build
list target (assume sdk installed already in step 5 above)
android list targetupdate project with target 1 (assume target id 1 is already created with API-16 in step 5 above)
android update project -n com.beginndkgamecode.hellodroid -t 1 -p .list avd (assume "NokiaX" is created in step 5 above)
android list avd8. start emulator
emulator -avd NokiaX -scale 0.5 &debug build
ant clean && ant debuginstall apk to emulator
ant debug installNote:
(1) use ant uninstall if need to remove
(2) use Control-fn-F12 to rotate the emulator in Mac
(3) the generated apk file is bin/com.beginndkgamecode.hellodroid-debug.apk
(4) add android:icon to AndroidManifest.xml like this to add a default icon.
<application android:icon="@drawable/ic_launcher" android:label="@string/app_name" ...

Saturday, May 3, 2014
Nokia X emulator skin
Download : http://www.2shared.com/file/XCjdetAW/NOKIAX.html
Supports: Landscape and Portrait, Power and Volume Up/Down and Back buttons
Display width : 480
Display height : 800
Installation Location : <sdk>\add-ons\addon-nokia_x_services_device-nokia-16\skins

Supports: Landscape and Portrait, Power and Volume Up/Down and Back buttons
Display width : 480
Display height : 800
Installation Location : <sdk>\add-ons\addon-nokia_x_services_device-nokia-16\skins


Friday, May 2, 2014
How to install Android Studio in Mac OS X

(3) Install JDK say jdk-7u51-macosx-x64.dmg from http://www.oracle.com/technetwork/java/javase/downloads/jdk7-downloads-1880260.html
(2) Download the latest Android Studio IDE from http://tools.android.com/download/studio/canary/latest and install to /Applications/
(3) Download the Android Studio with SDK from http://dl.google.com/dl/android/studio/ide-zips/0.4.2/android-studio-ide-133.970939-mac.zip and extract the sdk subfolder to /Applications/Andriod Studio.app/sdk
or download the SDK here http://dl.google.com/android/android-sdk_r23.0.2-macosx.zip
(4) Change ownership for /Applications/Android Studio.app/sdk using sudo chown -R <yourid>:staff /Applications/Android Studio.app/sdk
(5) Launch Android Studio and change Project Structure to
SDK Location : /Applications/Android Studio.app/sdk
JDK Location : /Library/Java/JavaVirtualMachines/jdk1.7.0_51.jdk/Contents/Home

(7) Tools -> Android -> AVD Manager to add AVD
(8) Import Project to test build TouchCalculator.rar. This project has been modified from here and for test build on Android Studio API-19
Download -> http://www.2shared.com/file/XIswagFF/TouchCalculator.html

Another example on how to use Android Studio to create new app can be reference from the workflow demo in this video http://www.youtube.com/watch?v=K2lF862TjU8 The source file in the video page was dead. New project should be created in Android Studio with App Name as "PeamonCalculator" and packagename as "com.example.peamoncalculator.app" and using the default theme "Holo Light with Dark Action Bar" Download the project source from here and replace the following 2 files in the newly created project and use the Nokia X skin for this project source
PeamonCalculator/app/src/main/java/com/example/peamoncalculator/app/MainActivity.java
PeamonCalculator/app/src/main/res/layout/activity_main.xml
unzip ~/Downloads/PeamonCalculator.zip -d ~/YourAndroidStudioProjectFolder/

Tuesday, June 19, 2012
androideabi Utilities Binaries
These are the utilities for Android Terminal Access
Download here
http://apiexplorer.googlecode.com/files/androideabi_binary.zip
bash 4.1 (requires root)
make (useful for GCC Plugin for C4droid)
python (standalone script requires PythonForAndroid_r4.apk)
perl (standalone script requires perl_for_android_r1.apk)
vim (with multibyte support)
wget (in case your busybox's wget was broken with bad address)
curl (how I build this ? -> here)
utelnetd (telnet daemon, utelnetd -p 1025 -l /system/bin/bash &)
scp
ssh
rsync
Instructions:
root the device and push these utilities to /system/bin/ or /system/xbin and chmod 04755 or chmod 755, if your /system folder is readonly, you might need Root Explorer to mount it as RW.
vim with multibyte support
Before the use of vim, you should setup TERM as
And for editing UTF-8 File, use
Download here
http://apiexplorer.googlecode.com/files/androideabi_binary.zip
bash 4.1 (requires root)
make (useful for GCC Plugin for C4droid)
python (standalone script requires PythonForAndroid_r4.apk)
perl (standalone script requires perl_for_android_r1.apk)
vim (with multibyte support)
wget (in case your busybox's wget was broken with bad address)
curl (how I build this ? -> here)
utelnetd (telnet daemon, utelnetd -p 1025 -l /system/bin/bash &)
scp
ssh
rsync
Instructions:
root the device and push these utilities to /system/bin/ or /system/xbin and chmod 04755 or chmod 755, if your /system folder is readonly, you might need Root Explorer to mount it as RW.
adb push bash /system/bin/bash

adb shell "chmod 04755 /system/bin/bash"
su -c /system/bin/bashvim with multibyte support
Before the use of vim, you should setup TERM as
export TERM=xtermAnd for editing UTF-8 File, use
vim --cmd "set encoding=utf-8" myfile.txtWednesday, May 30, 2012
[How to] Install Android 4.0 under VMware
1) Download image from http://www.buildroid.org/Download/android-x86-vm-20120307.iso.gz and decompress it
2) Use VMWare to mount the iso and create a virtual machine
Type : FreeBSD
Harddisk : 10G
Ram : 512MB
3) Choose Install Android-x86 to harddisk

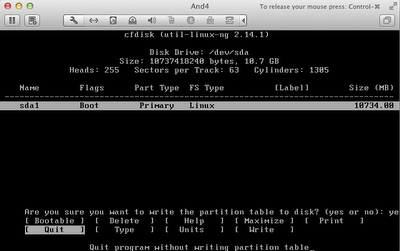
4) Create partition and format the primary partition and then create a fake SD Card for 2G

5) After Android OS started. Run the Terminal Emulator inside the Android to get the IP Address. Type "netcfg" inside the Terminal
say the ipaddress is 172.16.85.133

6) To push file or app to the Android OS under VMWare, you need to install Android SDK. (say installed in ~/android-sdk-macosx/)
7) For example, to push Music to the sdcard
8) To compile and install a sample app to the Android OS
# -r option is to reinstall
~/android-sdk-macosx/platform-tools/adb install -r bin/MainActivity-debug.apk
9) Shell access
2) Use VMWare to mount the iso and create a virtual machine
Type : FreeBSD
Harddisk : 10G
Ram : 512MB
3) Choose Install Android-x86 to harddisk

4) Create partition and format the primary partition and then create a fake SD Card for 2G


5) After Android OS started. Run the Terminal Emulator inside the Android to get the IP Address. Type "netcfg" inside the Terminal
say the ipaddress is 172.16.85.133

6) To push file or app to the Android OS under VMWare, you need to install Android SDK. (say installed in ~/android-sdk-macosx/)
7) For example, to push Music to the sdcard
~/android-sdk-macosx/platform-tools/adb connect 172.16.85.133

~/android-sdk-macosx/platform-tools/adb push ~/Mymusic.mp3 /sdcard/Music/
8) To compile and install a sample app to the Android OS
~/android-sdk-macosx/platform-tools/adb connect 172.16.85.133

cd ~/android-sdk-macosx/samples/ActionBarCompat/

~/android-sdk-macosx/tools/android update project -t 1 -p .

ant debug

~/android-sdk-macosx/platform-tools/adb install bin/MainActivity-debug.apk
# -r option is to reinstall
~/android-sdk-macosx/platform-tools/adb install -r bin/MainActivity-debug.apk
9) Shell access
~/android-sdk-macosx/platform-tools/adb connect 172.16.85.133

~/android-sdk-macosx/platform-tools/adb shell
Sunday, November 1, 2009
[How-to] install Debian and openssh server in T-Mobile G1
Assume you have installed CynogenMod and get busybox in it, you can install Debian system in G1 or other Android phone that has been rooted and have busybox in that custom ROM.
The instruction of setting up debian in G1 is in saurik's site here http://www.saurik.com/id/10
But some of the information are outdated, as the rooting is very simple now and the busybox comes with all custom cooked ROMs.
I like this method as the Debian system is installed in a standalone img file which can be copied to other Android phones.
(1) Download the Debain G1 image here
http://modmygphone.com/files/debian-G1.zip
or
http://rapidshare.com/files/161776007/debian-armel-750.img.bz2
unzip bz2 file with
bunzip2 debian-armel-750.img.bz2
(2) unzip it and copy the img file to sdcard. The image is 750M in size, so make sure you have enough space in sdcard.
(3) su shell access into G1
(4) setup mount and chroot
(5) change root password and install OpenSSH and start it
(6) If the default package source does not work, you can change this file /etc/apt/sources.list to
(7) if you want to install gcc compiler
(8) exit the debian system
(9) Before you proceed to copy the Debian system to the /system/sd, please consider to check the partition size of /system/sd first. If you want to manually increase the ext2 partition size, please follow this guide below. Please backup before re-partition as the process will wipe your sdcard data.
http://forum.xda-developers.com/showthread.php?t=534714
This how you can backup the /system/sd and sdcard
and this is how you restore data after repartition the sdcard (remember this is when the phone is booted up and not in recovery mode
(10) Reboot G1
(11) Copy the Debian system to /system/sd if you use CynogenMod ROM and have ext2 partition in the sdcard
(12) create the mount script as /system/sd/userinit.sh
append this script if you want to start ssh server automatically
(12) Reboot G1
(13) Then you can ssh to your G1 by using ssh root@xxx.xxx.xxx.xxx after enable wifi in G1, where xxx.xxx.xxx.xxx is the IP address of G1.
This is how you chroot manually when you use adb shell access
The instruction of setting up debian in G1 is in saurik's site here http://www.saurik.com/id/10
But some of the information are outdated, as the rooting is very simple now and the busybox comes with all custom cooked ROMs.
I like this method as the Debian system is installed in a standalone img file which can be copied to other Android phones.
(1) Download the Debain G1 image here
http://modmygphone.com/files/debian-G1.zip
or
http://rapidshare.com/files/161776007/debian-armel-750.img.bz2
unzip bz2 file with
bunzip2 debian-armel-750.img.bz2
(2) unzip it and copy the img file to sdcard. The image is 750M in size, so make sure you have enough space in sdcard.
adb push debian-armel-750.img /sdcard/kit/(3) su shell access into G1
adb shell
su
(4) setup mount and chroot
export kit=/sdcard/kit
export mnt=/data/local/mnt
export TERM=linux
export HOME=/root
export PATH=$bin:/usr/bin:/usr/sbin:/bin:$PATH

busybox clear

busybox mkdir -p $mnt

busybox mount -o loop,noatime $kit/debian-armel-750.img $mnt

busybox mount -t devpts devpts $mnt/dev/pts
busybox mount -t proc proc $mnt/proc
busybox mount -t sysfs sysfs $mnt/sys

busybox mkdir -p $mnt/mnt
busybox mkdir -p $mnt/mnt/sdcard $mnt/mnt/system
busybox mkdir -p $mnt/mnt/data $mnt/mnt/dev

busybox mount --bind /sdcard $mnt/mnt/sdcard
busybox mount --bind /system $mnt/mnt/system
busybox mount --bind /data $mnt/mnt/data
busybox mount --bind /dev $mnt/mnt/dev
busybox mount -t tmpfs tmpfs $mnt/tmp -o noatime,mode=1777


busybox chroot $mnt /bin/bash
# now G1 should be in Debian System

rm -f /etc/mtab
ln -s /proc/mounts /etc/mtab
(5) change root password and install OpenSSH and start it
passwd root

apt-get install debian-keyring debian-archive-keyring
apt-get update
apt-get upgrade
apt-get install openssh-server openssh-client
/etc/init.d/ssh start
(6) If the default package source does not work, you can change this file /etc/apt/sources.list to
deb http://ftp.us.debian.org/debian lenny main
(7) if you want to install gcc compiler
apt-get install build-essential
(8) exit the debian system
exit(9) Before you proceed to copy the Debian system to the /system/sd, please consider to check the partition size of /system/sd first. If you want to manually increase the ext2 partition size, please follow this guide below. Please backup before re-partition as the process will wipe your sdcard data.
http://forum.xda-developers.com/showthread.php?t=534714
This how you can backup the /system/sd and sdcard
adb pull /system/sd/app app
adb pull /system/sd/app-private app-private
adb pull /system/sd/dalvik-cache dalvik-cache
adb pull /sdcard sdcard
and this is how you restore data after repartition the sdcard (remember this is when the phone is booted up and not in recovery mode
adb push app /system/sd/app
adb push app-private /system/sd/app-private
adb push dalvik-cache /system/sd/dalvik-cache
adb push sdcard /sdcard
(10) Reboot G1
reboot(11) Copy the Debian system to /system/sd if you use CynogenMod ROM and have ext2 partition in the sdcard
cd /data/local/mnt
tar cf - . | (cd /system/sd/; tar xvf -)
(12) create the mount script as /system/sd/userinit.sh
export mnt=/system/sd

export TERM=linux
export HOME=/root

busybox mount -t devpts devpts $mnt/dev/pts
busybox mount -t proc proc $mnt/proc
busybox mount -t sysfs sysfs $mnt/sys

busybox mount --bind /sdcard $mnt/mnt/sdcard
busybox mount --bind /system $mnt/mnt/system
busybox mount --bind /data $mnt/mnt/data
busybox mount --bind /dev $mnt/mnt/dev
append this script if you want to start ssh server automatically
busybox chroot /system/sd /etc/init.d/ssh start(12) Reboot G1
reboot(13) Then you can ssh to your G1 by using ssh root@xxx.xxx.xxx.xxx after enable wifi in G1, where xxx.xxx.xxx.xxx is the IP address of G1.
This is how you chroot manually when you use adb shell access
chroot /system/sd /bin/bashSaturday, October 24, 2009
Android NDK add stlport and compile C++ program
(1) Assume you have Android ndk 1.6 and your ndk directory is in ~/Android/android-ndk-1.6_r1 and you are using mac
download ndk-wrapper from
reference
http://umbel.mooo.com/git?p=ndk-wrappers.git;a=summary
(2) Edit ~/Android/ndk-wrappers/setup.sh and add these
(3) Edit ~/Android/ndk-wrappers/scripts/build-stlport.sh ad add these
(4) Edit ~/Android/ndk-wrappers/scripts/env-utils.sh and change / add these
For linux
HOST=linux-x86
For CYGWIN
HOST=windows
(5) Change ~/Android/ndk-wrappers/stlport/build/lib/android.mak
from
to
(6) Add link
(7) For Mac only, upgrade sed using Mac port
(8) build stlport
(9) Create hello.cpp to test
(10) Compile
(11) Sent to device for testing
You can use Makefile
download ndk-wrapper from
cd ~/Android
git clone git://umbel.mooo.com/ndk-wrappers.git
reference
http://umbel.mooo.com/git?p=ndk-wrappers.git;a=summary
(2) Edit ~/Android/ndk-wrappers/setup.sh and add these
export HOST=darwin-x86
export NDK_DIR=~/Android/android-ndk-1.6_r1
export NDK_WRAPPERS_BASE=~/Android/ndk-wrappers
(3) Edit ~/Android/ndk-wrappers/scripts/build-stlport.sh ad add these
export NDK_WRAPPERS_BASE=~/Android/ndk-wrappers
export PATH=~/Android/ndk-wrappers/bin:$PATH
(4) Edit ~/Android/ndk-wrappers/scripts/env-utils.sh and change / add these
SYSROOT="${NDK_DIR}/build/platforms/android-4/arch-arm"
HOST=darwin-x86
For linux
HOST=linux-x86
For CYGWIN
HOST=windows
(5) Change ~/Android/ndk-wrappers/stlport/build/lib/android.mak
from
--sysroot=$(NDK_DIR)/build/platforms/android-1.5/arch-arm \
to
--sysroot=$(NDK_DIR)/build/platforms/android-4/arch-arm \
(6) Add link
cd ~/Android/ndk-wrappers/stlport/build/Makefiles/gmake
ln -s linux arm-linux
(7) For Mac only, upgrade sed using Mac port
sudo port install gsed
sudo ln -s /opt/local/bin/gsed /opt/local/bin/sed
(8) build stlport
cd ~/Android/ndk-wrappers
export NDK_DIR=~/Android/android-ndk-1.6_r1
./setup.sh
(9) Create hello.cpp to test
#include <iostream>
using namespace std;
int main() {
  cout << "hello, world\n";
  return 0;
}
(10) Compile
~/Android/ndk-wrappers/bin/arm-linux-g++ -o hello hello.cpp -L~/Android/ndk-wrappers/stlport/build/lib/obj/arm-linux-gcc/so
(11) Sent to device for testing
adb push hello /data/local/bin/hello
adb shell chmod 755 /data/local/bin/hello
adb shell /data/local/bin/hello
You can use Makefile
- Makefile Select all
APP := hello
SDKTOOL := ~/Android/android-sdk-mac_x86-1.6_r1/tools
WRAPPER := ~/Android/ndk-wrappers
STLLIB := -L~/Android/ndk-wrappers/stlport/build/lib/obj/arm-linux-gcc/so
BIN := $(WRAPPER)/bin
CPP := $(BIN)/arm-linux-g++
CC := $(BIN)/arm-linux-gcc

all: $(APP)

OBJS += $(APP).o

$(APP): $(OBJS)
 $(CPP) $(LDFLAGS) -o $@ $(STLLIB) $^

%.o: %.c
 $(CC) -c $(INCLUDE) $(CFLAGS) $< -o $@

%.o: %.cpp
 $(CPP) -c $(INCLUDE) $(CFLAGS) $(CPPFLAGS) $< -o $@

install: $(APP)
 $(SDKTOOL)/adb push $(APP) /data/local/bin/$(APP)
 $(SDKTOOL)/adb shell chmod 755 /data/local/bin/$(APP)

shell:
 $(SDKTOOL)/adb shell

run:
 $(SDKTOOL)/adb shell /data/local/bin/$(APP)

clean:
 @rm -f $(APP).o $(APP)
Sunday, June 14, 2009
A better HTC Magic Android Emulator Skin
You might have found a HTC Magic Skin for the Android Emulator, but the button positions are wrong and I have modified it to reflect my actual HTC Magic device.
You can download from here
Screenshot

You can download from here
Screenshot
Monday, September 29, 2008
[How-To] Android emulator
(1) How to install emulator only (that is no JDK, Eclipse IDE or compiler)
(a) Download Android SDK from
http://code.google.com/android/download_list.html
The current version is
android-sdk-windows-1.0_r1.zip (windows)
android-sdk-linux_x86-1.0_r1.zip (linux)
unzip it and put the folder (android-sdk-windows-1.0_r1) to say under
Windows OS
Linux / Mac OS X
(b) start the emulator in command windows (windows-R -> cmd) / (Linux/Mac OS X -> Terminal) for the first time to setup data directory
Windows OS
Linux / Mac OS X
(2) How to create sdcard for emulator (e.g. 500M)
e.g. To create a sdcard image of 500M with filename sd500m.img
Windows OS
Linux / Mac OS X
when starting the emulator and adding -sdcard option
Windows OS
Linux / Mac OS X
(3) How to scale the emulator size when the emulator screen is out of view of your computer
when starting the emulator and adding -scale option (range from 0.1 to 3)
e.g. start the emulator with a scale of 0.5
Windows OS
Linux / Mac OS X
(4) How to copy Musics and Pictures to the sdcard image for Android emulator
The sdcard image is a FAT32 image. You just double click the file in Mac OSX to mount it.
Inside it, create folders called Musics and Pictures and put your mp3 files and pictures as per screen dump below
(5) How to copy files to sdcard while the emulator is running or when you cannot mount it.
You can mount the sdcard image while the emulator is running, but sometimes you want to copy files to the sdcard in command line mode run this
Make Sure that the emulator is running
Windows OS
Linux / Mac OS X
However, the emulator will need to restart so that it can acknowledge the new file. This is currently the limitation of the emulator
when copying back from emulator sdcard to local file
Windows OS
Linux / Mac OS X
(6) How to get shell access to emulator
The emulator must be running, and run this
Windows OS
Linux / Mac OS X
(7) How to add path of the emulator tools directory to Windows OS, so as no need to change directory to sdk directory
On Windows, right click on My Computer, and select Properties. Under the Advanced tab, hit the Environment Variables button, and in the dialog that comes up, double-click on Path under System Variables and add this to end of the text
Windows OS
Please take note that you have to restart the command window for the path to become effective
(8) How to change skin for the emulator
You can download some iPhone skins for Android emulator here
http://www.anddev.org/emulator_iphone_skin_-_qvga-hvga_landscape-portrait-t109.html
(9) How to change wallpaper, add new icons to homescreen and move/delete icons.
At Home Screen, press Menu
+ Add -> for adding icons to home screen
Wallpaper -> to change wallpaper
You can flip the homescreen to left and right and add icons there
To delete the icon just click and hold the button and a trash will appear above the menu button then you can drag the icon to the trash and delete it
To move the icon, click and hold the icon and then drag to new position.

(a) Download Android SDK from
http://code.google.com/android/download_list.html
The current version is
android-sdk-windows-1.0_r1.zip (windows)
android-sdk-linux_x86-1.0_r1.zip (linux)
unzip it and put the folder (android-sdk-windows-1.0_r1) to say under
Windows OS
D:\Android\
Linux / Mac OS X
~/Android/
(b) start the emulator in command windows (windows-R -> cmd) / (Linux/Mac OS X -> Terminal) for the first time to setup data directory
Windows OS
D:
cd D:\Android\android-sdk-windows-1.0_r1\tools
emulator -datadir D:\Android
Linux / Mac OS X
cd ~/Android/android-sdk-linux_x86-1.0_r1/tools
./emulator -datadir ~/Android
(2) How to create sdcard for emulator (e.g. 500M)
e.g. To create a sdcard image of 500M with filename sd500m.img
Windows OS
D:
cd D:\Android\android-sdk-windows-1.0_r1\tools
mksdcard -l SD500M 500M D:\Android\sd500m.img
Linux / Mac OS X
cd ~/Android/android-sdk-linux_x86-1.0_r1/tools
./mksdcard -l SD500M 500M ~/Android/sd500m.img
when starting the emulator and adding -sdcard option
Windows OS
D:
cd D:\Android\android-sdk-windows-1.0_r1\tools
emulator -sdcard D:\Android\sd500m.img  [.... other options]
Linux / Mac OS X
cd ~/Android/android-sdk-linux_x86-1.0_r1/tools
./emulator -sdcard ~/Android/sd500m.img  [.... other options]
(3) How to scale the emulator size when the emulator screen is out of view of your computer
when starting the emulator and adding -scale option (range from 0.1 to 3)
e.g. start the emulator with a scale of 0.5
Windows OS
D:
cd D:\Android\android-sdk-windows-1.0_r1\tools
emulator -scale 0.5 [.... other options]
Linux / Mac OS X
cd ~/Android/android-sdk-linux_x86-1.0_r1/tools
./emulator -scale 0.5 [.... other options]
(4) How to copy Musics and Pictures to the sdcard image for Android emulator
The sdcard image is a FAT32 image. You just double click the file in Mac OSX to mount it.
Inside it, create folders called Musics and Pictures and put your mp3 files and pictures as per screen dump below
(5) How to copy files to sdcard while the emulator is running or when you cannot mount it.
You can mount the sdcard image while the emulator is running, but sometimes you want to copy files to the sdcard in command line mode run this
Make Sure that the emulator is running
Windows OS
D:
cd D:\Android\android-sdk-windows-1.0_r1\tools
adb push mynotebookphoto.png sdcard/Pictures/
Linux / Mac OS X
cd ~/Android/android-sdk-linux_x86-1.0_r1/tools
./adb push mynotebookphoto.png sdcard/Pictures/
However, the emulator will need to restart so that it can acknowledge the new file. This is currently the limitation of the emulator
when copying back from emulator sdcard to local file
Windows OS
D:
cd D:\Android\android-sdk-windows-1.0_r1\tools
adb pull sdcard/Pictures/image01.jpg images01_fromsdcard.jpg
Linux / Mac OS X
cd ~/Android/android-sdk-linux_x86-1.0_r1/tools
./adb pull sdcard/Pictures/image01.jpg images01_fromsdcard.jpg
(6) How to get shell access to emulator
The emulator must be running, and run this
Windows OS
D:
cd D:\Android\android-sdk-windows-1.0_r1\tools
adb shell
Linux / Mac OS X
cd ~/Android/android-sdk-linux_x86-1.0_r1/tools
./adb shell
(7) How to add path of the emulator tools directory to Windows OS, so as no need to change directory to sdk directory
On Windows, right click on My Computer, and select Properties. Under the Advanced tab, hit the Environment Variables button, and in the dialog that comes up, double-click on Path under System Variables and add this to end of the text
Windows OS
D:\Android\android-sdk-windows-1.0_r1\tools;
Please take note that you have to restart the command window for the path to become effective
(8) How to change skin for the emulator
You can download some iPhone skins for Android emulator here
http://www.anddev.org/emulator_iphone_skin_-_qvga-hvga_landscape-portrait-t109.html
(9) How to change wallpaper, add new icons to homescreen and move/delete icons.
At Home Screen, press Menu
+ Add -> for adding icons to home screen
Wallpaper -> to change wallpaper
You can flip the homescreen to left and right and add icons there
To delete the icon just click and hold the button and a trash will appear above the menu button then you can drag the icon to the trash and delete it
To move the icon, click and hold the icon and then drag to new position.
Wednesday, September 24, 2008


Subscribe to:
Posts (Atom)


